
Chocolate chip scones always bring me back to chilly mornings when I’d wake up to the smell of warm butter mixing with sweet dough. I still remember the first time I tried making chocolate chip scones on my own. I kept checking the oven like a kid because the aroma filled the whole kitchen. This chocolate chip scones recipe gives you that same feeling. It uses simple ingredients and a quick method, so you don’t fuss with anything complicated. If you love an easy scone recipe or want a chocolate scone recipe that works every time, this guide walks you through everything.
The Story Behind Chocolate Chip Scones
How chocolate chip scones became a classic
Chocolate chip scones feel familiar because they blend comfort with a touch of sweetness. When I first made chocolate chip scones for brunch with friends, I noticed how quickly the plate emptied. The crisp edges mixed with the soft center make them relaxing to eat. Each bite tastes buttery with melted dark chocolate. This chocolate scone recipe reflects the charm of classic British scones but keeps the process light and easy. You work with cold butter, a simple dough, and dark chocolate chips. These steps give you dependable texture and steady results.
Why this easy scones method works so well
This easy scones method gives you control without stress. You whisk dry ingredients together. You grate the butter, which forms small shards that coat the flour. This action forms tiny layers that turn crisp when baked. I use dark chocolate chips because they melt slowly and create warm pockets in every bite. When you bring everything together, the dough forms quickly. You mix only until it comes together. That prevents dense or heavy scones. Each step supports the flavor, texture, and shape you want from chocolate chip scones.
Print
Chocolate Chip Scones
- Total Time: 35 minutes
- Yield: 10 1x
Description
These easy chocolate chip scones are slightly sweet, buttery, and tender with crisp edges.
Ingredients
2 cups all-purpose flour
1/4 cup sugar
1 1/4 tsp baking powder
1/4 tsp baking soda
1/4 tsp salt
1/2 cup cold unsalted butter
1 cup dark chocolate chips
3/4 cup buttermilk
1 tsp vanilla extract
Instructions
1. Preheat oven to 400°F. Whisk flour, sugar, baking powder, baking soda, and salt.
2. Grate cold butter and blend into dry mix until crumbly. Stir in chocolate chips.
3. Combine buttermilk and vanilla. Mix into dry ingredients until just combined.
4. Knead lightly on floured surface. Shape into 1 1/2-inch thick circle. Cut into wedges.
5. Place on lined sheet. Brush with milk. Sprinkle sugar. Bake 20–22 minutes. Cool on rack.
Notes
Use fresh baking powder and baking soda for best rise.
Keep butter very cold for flaky layers.
Do not overmix or the scones become tough.
Store leftovers 2 days at room temp or 5 days in fridge.
- Prep Time: 15 minutes
- Cook Time: 20 minutes
- Category: Breakfast
- Method: Baking
- Cuisine: British
Nutrition
- Calories: 326
What Makes This Chocolate Scone Recipe Stand Out
How cold butter shapes perfect chocolate chip scones
Cold butter matters in every chocolate scone recipe. When you grate cold or frozen butter, it blends through the dough without melting. As the scones bake, those butter shreds release steam. That steam creates small pockets inside the scones. This process forms flaky layers and gives chocolate chip scones their familiar crumb. You get a crisp exterior and a soft center. When I started using frozen butter instead of simply cold butter, I noticed the scones kept their height and shape better. Small changes like this improve your results every time.
Why buttermilk creates a smooth, rich crumb
Buttermilk gives chocolate chip scones a soft interior. Its tang balances the sweetness from the chocolate chips. When I first switched from regular milk to buttermilk, the difference felt huge. The dough came together faster and baked evenly. Buttermilk also reacts with baking soda, giving the scones noticeable lift. That reaction makes this easy scones recipe dependable, even if you’re new to baking. The dough stays tender. The flavor stays balanced. Each bite of these chocolate chip scones tastes full without feeling heavy.
Step-by-Step Logic Behind This Easy Scones Recipe
Mixing the dough without making it tough
When you mix the wet and dry ingredients for chocolate chip scones, you want a rough dough. You stop mixing as soon as you see everything combine. If you keep blending the dough, the gluten builds too much strength. That strength makes the scones firm instead of tender. I used to overmix my dough because I thought smoother meant better. When I switched to a light hand, my chocolate chip scones rose higher and stayed delicate. That simple shift made the texture smooth yet crumbly.
Shaping and cutting chocolate chip scones for best results
Shaping influences how your chocolate chip scones bake. You press the dough into a circle that’s about one and a half inches thick. You cut the dough into wedges so each piece bakes at the same pace. I tried shaping the dough thinner once, and the scones dried out fast. Keeping the thickness steady protects moisture and helps create those golden tops. You can adjust the number of wedges depending on the size you want, but holding the same thickness makes the biggest difference.
Baking Chocolate Chip Scones the Right Way
Temperature and timing for perfectly golden chocolate chip scones
This chocolate chip scones recipe uses a 400°F oven. That heat shocks the dough so it rises fast. The outside browns while the inside stays soft. When I tested lower temperatures, the scones spread more and browned unevenly. At 400°F, the shape stays tight. The butter melts at the right pace. You get even color across the top. The chocolate chips soften without burning. You check the scones around the twenty-minute mark. Your toothpick should come out clean with small crumbs.
Keeping scones nice and crisp without drying them
After baking, you lift the chocolate chip scones onto a wire rack. Air moves around them and keeps their exterior crisp. If you leave them on the baking sheet, the bottoms may steam and soften. I found that cooling the scones on a rack made a huge difference in texture. When the chocolate sets slightly, the crumb stays balanced. You can enjoy them warm or at room temperature. Both options taste rich and comforting.
Pro Tips to Improve Your Chocolate Chip Scones
Using fresh baking powder and baking soda
Fresh leavening matters. When I used older baking powder once, my chocolate chip scones barely rose. Now I always test baking powder in hot water. If it fizzes, it works. You do the same with baking soda. These checks take seconds and protect the texture of your scones. Fresh leavening gives you airy pockets inside and a tall rise. It also helps the dough brown evenly.
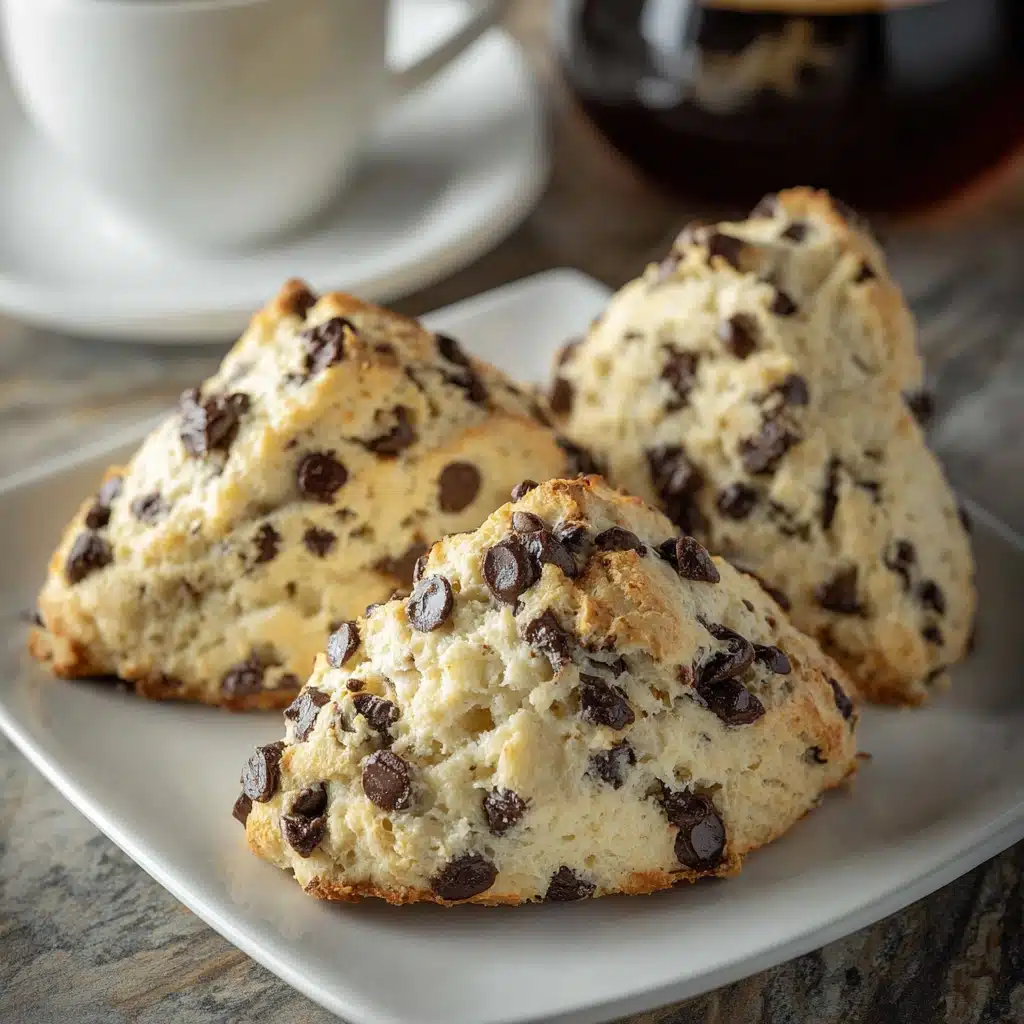
Storing leftover chocolate chip scones the right way
You can keep leftover chocolate chip scones for two days at room temperature or five days in the fridge. I store mine in a sealed container lined with a paper towel. That paper towel absorbs extra moisture so the scones stay crisp. You can warm them in the oven for a few minutes to bring back freshness. The dark chocolate melts slightly again, which makes them taste newly baked.
FAQ
How do I keep chocolate chip scones from spreading?
Use cold butter and avoid overmixing. Shape the dough thick and place the wedges on a cold baking sheet.
Can I freeze the dough?
Yes. Freeze the wedges on a tray. Then bake from frozen and add a few extra minutes.
Can I use milk instead of buttermilk?
Yes, but the texture will feel less tender. You can mix one cup of milk with one tablespoon of vinegar as a substitute.
Why are my scones dense?
You may have overmixed the dough or used old baking powder. Keep your mixing light and your ingredients fresh.
Should I chill the dough before baking?
You can. Chilling helps the scones keep their shape and rise taller.
Conclusion
Chocolate chip scones feel rewarding because they mix warm butter notes with rich chocolate. This easy scones method respects simplicity. You work fast. You use cold butter. You trust the dough. That’s why this chocolate scone recipe creates buttery layers, crisp edges, and a soft center. With small habits and steady steps, you get a batch that tastes familiar, comforting, and full of flavor every time.
Discover more delicious recipes by following me on Facebook and Pinterest.