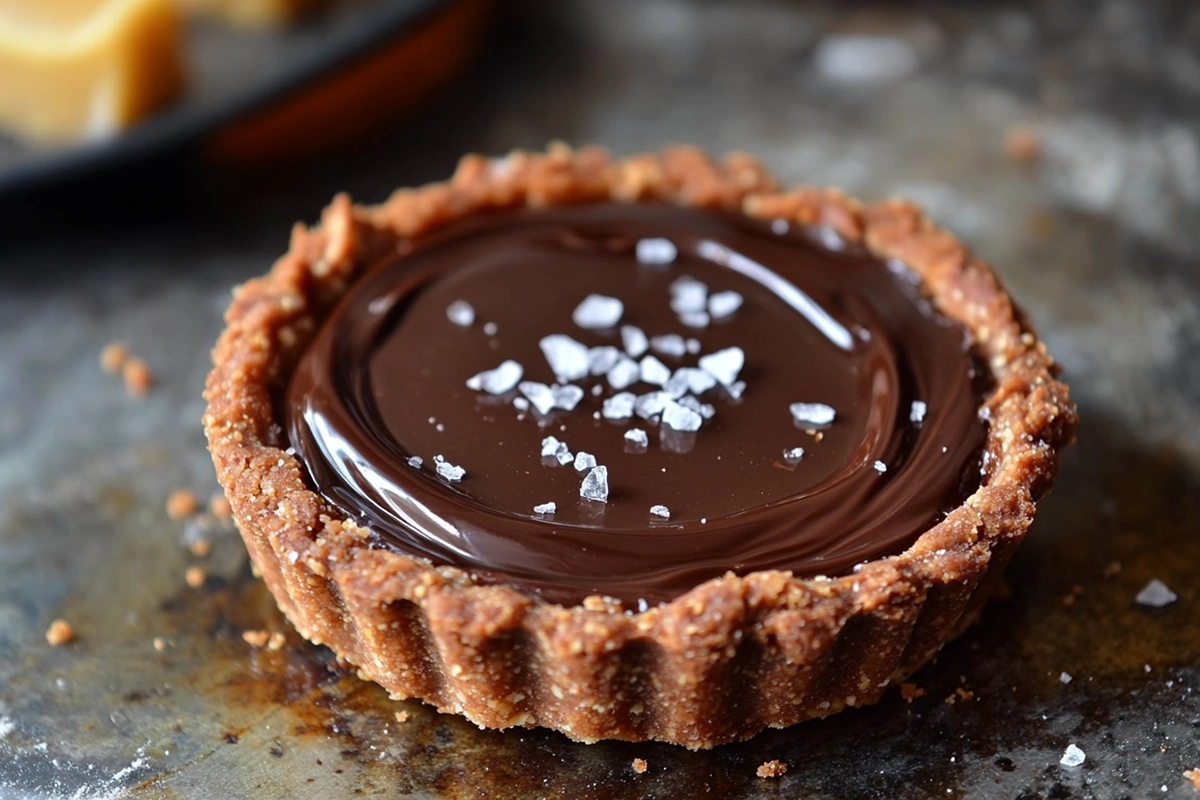
Who can resist the rich blend of melt-in-your-mouth chocolate, creamy salted caramel, and a flaky tart crust? Chocolate Salted Caramel Tarts aren’t just another dessert—they’re a showstopper. Whether you’re baking for a special occasion or just craving something a little extra, this dessert delivers layers of indulgence in every bite.
In this guide, we’ll dig deep into what makes this treat so irresistible—from its history to the secret behind that perfectly gooey caramel. You’ll find pro tips, tricks, and variations to make it your own. So, let’s kick things off with a solid foundation.
Introduction
What Are Chocolate Salted Caramel Tarts?
Chocolate Salted Caramel Tarts are rich pastry desserts that combine three luxurious layers—buttery tart crust, smooth salted caramel, and a velvety chocolate ganache topping. Each bite gives you the perfect mix of sweet, salty, and decadent. It’s a dessert that’s elegant enough for a dinner party yet simple enough to make at home.
This tart’s appeal lies in its texture and balance. The crunch of the crust, the gooey caramel center, and the silky chocolate top offer a taste experience that never fails to impress. Unlike traditional pies or simple chocolate treats, these tarts stand out for their refined structure and stunning presentation.
Popularity and Appeal
There’s no denying it—salted caramel has taken the dessert world by storm. And when it’s paired with chocolate, the results are magic. What started as a trend is now a staple on menus, baking blogs, and recipe books across the globe.
Why is it so loved? Because it brings together contrasting flavors that elevate each other. The salt cuts through the sweetness and enhances the richness of the chocolate. It keeps the dessert from feeling too heavy, even when it’s packed with indulgent ingredients.
Chocolate Salted Caramel Tarts aren’t just tasty—they’re also visually stunning. Their glossy finish and layered look make them Instagram-worthy, and they’re easily customized for any crowd. From mini tartlets to full-size tarts, you’ve got options.
Whether you’re a baking newbie or a seasoned pastry pro, these tarts will find a place in your dessert lineup. In the sections ahead, we’ll walk through everything you need to know to make them flawlessly.
History and Origin
Evolution of Tarts in Culinary History
Tarts have been a beloved dessert for centuries. Their roots go way back to the medieval period in Europe, where they were made using simple ingredients like flour, fat, and water. These early tarts were often savory and filled with meats or vegetables. Over time, however, sweet tarts became more popular, especially in French and English kitchens.
The pastry itself evolved into something more delicate, often paired with fruit, cream, or chocolate. With the introduction of sugar and butter, tarts became a refined treat for the upper class, often enjoyed with tea or at social gatherings.
In recent decades, tarts have taken on a new life with modern flavors like chocolate and salted caramel. The idea of using rich, smooth ganache and salted caramel inside a buttery crust is relatively new but has quickly become a favorite.
Emergence of the Salted Caramel Trend
Salted caramel began gaining popularity in the early 2000s. It was a new twist on traditional caramel, adding a touch of salt to balance the sweetness. The salt makes the caramel taste even more complex, bringing out its deep, rich flavor.
At first, salted caramel was seen in chocolates and candies. But soon, it made its way into desserts like ice cream, brownies, and, of course, tarts. Pairing it with chocolate in a tart is a match made in heaven. The chocolate’s richness and the caramel’s sweet-salty contrast create an irresistible combination.
The fusion of chocolate and salted caramel in tarts is a modern twist on a classic dessert. This combination has become so popular that it’s now a go-to for bakers and pastry chefs around the world. It’s easy to see why—each bite is an explosion of flavors and textures that makes it hard to stop at just one piece!
Ingredients Breakdown
Key Components of Chocolate Salted Caramel Tarts
To create the perfect Chocolate Salted Caramel Tart, you need a few key ingredients. Let’s take a look at each one and why it’s essential.
Chocolate: Types and Quality Considerations
The chocolate you use is crucial. High-quality chocolate will make a huge difference in taste. You’ll want to choose dark chocolate with at least 60% cocoa for a deep, rich flavor. However, you can also opt for milk chocolate if you prefer a sweeter, creamier taste.
When selecting chocolate, avoid cheap, overly processed options. The better the chocolate, the smoother and more flavorful your ganache will be.
Caramel: Crafting the Perfect Consistency
Caramel is another star ingredient. To get that perfect, smooth filling, you need sugar, butter, and heavy cream. The trick is in caramelizing the sugar just right—too much and it becomes bitter, too little and it’s not rich enough.
The key to salted caramel is the salt. Adding just a pinch elevates the sweetness and balances the flavors. Don’t skip this step! The salt brings out the depth of the caramel and creates that sweet-salty magic.
Pastry Crust: Options and Techniques
The crust holds everything together. You can use a classic shortcrust pastry, which is buttery and crisp. Some people like to go for a graham cracker crust for a quicker, simpler option.
To make the best pastry, you’ll need to handle the dough gently. Overworking it can make it tough. Be sure to chill the dough before rolling it out. This helps it keep its shape during baking.
The Role of Salt in Enhancing Flavor
Salt isn’t just for the caramel. It plays a vital role in balancing the sweetness of the chocolate and caramel. Without salt, the tart could taste too rich or overwhelming. The pinch of sea salt on top of the ganache gives it that extra flavor kick.
Salt also highlights the chocolate’s deep notes and makes the caramel taste even more luxurious. It’s a small addition, but it makes all the difference. Make sure to use flaky sea salt for the best effect.
Step-by-Step Recipe Guide
Now, let’s walk through how to make these delicious Chocolate Salted Caramel Tarts from start to finish. It’s easier than it sounds, and I’ll break it down into simple steps.
Preparing the Pastry Crust
Ingredients Needed
-
1 1/4 cups all-purpose flour
-
1/4 cup granulated sugar
-
1/2 cup unsalted butter (cold and cubed)
-
1 egg yolk
-
2-3 tbsp cold water
Mixing and Rolling Techniques
Start by mixing the flour and sugar in a bowl. Add in the cold butter and cut it into the dry ingredients until it forms a crumbly texture. You can do this by hand or with a pastry cutter. Once the butter is incorporated, add the egg yolk and mix gently. Slowly add the cold water, a little at a time, until the dough comes together.
Once the dough forms, roll it into a ball and wrap it in plastic wrap. Chill it in the fridge for at least 30 minutes. This helps it set and makes rolling easier.
Blind Baking Process
After chilling, roll out the dough on a floured surface. Press it into your tart pan, trimming any excess dough. Now, prick the bottom with a fork to prevent it from puffing up while baking. Cover the crust with parchment paper, and add pie weights or dried beans on top to keep it from rising.
Bake at 350°F (175°C) for 15-20 minutes or until the crust is lightly golden. Let it cool completely before adding the filling.
Making the Salted Caramel Filling
Sugar Caramelization Process
In a saucepan, heat sugar over medium heat. Stir constantly until it melts and turns golden brown. Be careful—it can burn quickly. Once the sugar is melted and amber in color, add butter and stir until smooth.
Incorporating Cream and Butter
Slowly pour in heavy cream while stirring. The mixture will bubble up, so go slowly. Continue to stir until the caramel is smooth. Once it’s mixed, remove it from the heat and add a pinch of sea salt for that perfect salty contrast.
Let the caramel cool for a few minutes before pouring it into the baked tart crust. Let it set in the fridge for about 2 hours.
Preparing the Chocolate Ganache Topping
Selecting Chocolate: Dark vs. Milk
For the ganache, you can use either dark or milk chocolate, depending on your taste. Dark chocolate gives a richer, more intense flavor, while milk chocolate offers a sweeter, creamier finish. Choose what you like best.
Heating Cream and Combining with Chocolate
Heat heavy cream in a saucepan until it just starts to simmer. Pour it over the chopped chocolate in a bowl. Let it sit for a few minutes, then stir until it becomes a smooth, glossy ganache.
Achieving the Desired Ganache Consistency
Once the ganache is ready, pour it over the cooled caramel layer. Use a spatula to smooth the top. The ganache will set as it cools, giving you a smooth and shiny finish.
Assembling the Tart
Layering Caramel over the Baked Crust
Once the crust has cooled, pour the salted caramel into the tart shell. Make sure it’s evenly spread out and level.
Pouring and Spreading the Ganache
Next, pour the chocolate ganache over the caramel layer. Gently spread it out, making sure it covers the caramel completely.
Setting and Cooling Times
Let the tart cool in the fridge for about 4 hours or until the ganache has set. If you’re in a rush, you can speed up the process by placing it in the freezer for about 30 minutes. But remember, slow and steady wins the race!
Once it’s set, you’re ready to serve your delicious Chocolate Salted Caramel Tart.
Variations and Customizations
One of the best things about Chocolate Salted Caramel Tarts is how easy it is to make them your own. You can switch up the crust, filling, or toppings to suit your taste or dietary needs. Here are some fun variations to try.
Alternative Crust Options
Gluten-Free Crust Alternatives
If you need a gluten-free option, don’t worry! You can make the crust with gluten-free flour. Simply substitute it for regular flour. Another great option is to use almond flour for a nutty, slightly sweet flavor. You can also try a rice flour crust, which gives a nice, crisp texture.
Nut-Based Crusts
For a more decadent crust, try a pecan or almond crust. Simply grind the nuts and mix them with melted butter and a little sugar. Press the mixture into your tart pan and bake. This crust will add an extra crunch and flavor to your tart that pairs perfectly with the caramel and chocolate.
Flavor Twists
Incorporating Nuts or Fruits
If you love nuts, you can add chopped hazelnuts, walnuts, or pecans to the caramel or ganache layer. It adds a bit of crunch and depth to the flavor. You can also experiment by adding some dried fruits like cherries or apricots to give your tart a unique twist.
Adding Liqueurs or Extracts
For an extra burst of flavor, try adding a few drops of vanilla extract to the caramel or ganache. If you’re feeling adventurous, you can add a splash of espresso for a mocha-like flavor, or even a bit of orange liqueur to give the chocolate an unexpected zing. Just be careful not to overpower the caramel.
Dietary Adjustments
Vegan and Dairy-Free Substitutions
If you’re following a vegan or dairy-free diet, you can easily adjust the ingredients. Use plant-based butter and non-dairy cream in the caramel and ganache. For the crust, opt for a vegan shortcrust pastry or a nut-based crust.
Reducing Sugar Content
If you’re looking to reduce sugar, you can use sugar substitutes like stevia or erythritol in place of granulated sugar. You may need to adjust the quantities since these substitutes can be sweeter than regular sugar. You can also cut down on the caramel sugar content and still have a delicious tart.
These variations allow you to create a Chocolate Salted Caramel Tart that fits your preferences, whether you’re avoiding gluten, looking for a healthier option, or just in the mood for something different. The best part? Each version still delivers that rich, decadent experience we all love!
Presentation and Serving Suggestions
A beautiful tart deserves to be presented well. Here are a few tips to make your Chocolate Salted Caramel Tarts look as amazing as they taste.
Garnishing Techniques
Using Sea Salt Flakes
One of the easiest ways to elevate your tart is by adding a pinch of flaky sea salt on top. The salt not only looks pretty but also enhances the flavor. It adds a little crunch and balances the sweetness of the caramel and chocolate.
Chocolate Shavings and Decorations
For a more elegant look, add some chocolate shavings or curls on top of the ganache. You can create these by using a vegetable peeler on a bar of chocolate. If you prefer something colorful, edible gold leaf or even fresh berries can make your tart look extra special.
Pairing with Beverages
Coffee and Espresso Pairings
Chocolate and coffee are a match made in heaven. Pair your tart with a strong cup of coffee or an espresso. The bitterness of the coffee complements the sweetness of the tart, making it the perfect duo.
Tea Pairings
If you prefer tea, go for a cup of black tea or chai. The slight spice of chai pairs wonderfully with the rich chocolate and caramel. It’s a comforting choice that brings out the flavors in the tart.
Portioning and Plating
Individual Tartlets vs. Large Tarts
You can serve your tart in two ways. You can make individual tartlets for a more personal touch or stick with a larger, family-style tart. Mini tartlets are perfect for parties and gatherings, while a big tart works well for special occasions or dinner parties.
Creative Plating Ideas
For extra flair, try serving your tart on a nice platter with a drizzle of caramel sauce around the edges. You can also add a few whipped cream dollops on the side for an extra indulgent touch. Make sure to have a sharp knife to cut clean slices, and be ready for guests to ask for seconds!
These little touches will make your Chocolate Salted Caramel Tarts even more irresistible and impressive.
Nutritional Information
While Chocolate Salted Caramel Tarts are a treat, it’s good to know what’s in them. Here’s a breakdown of the key nutritional info. Keep in mind that this can vary depending on the ingredients you use.
Caloric Content and Macronutrient Breakdown
One slice of Chocolate Salted Caramel Tart typically contains around 350 to 450 calories. The exact amount depends on the size of the slice and the specific ingredients you choose.
-
Carbs: Most of the calories come from carbs, primarily from the sugar in the caramel and the flour in the crust. You can expect around 40-50 grams of carbs per slice.
-
Fats: The buttery crust and creamy ganache contribute to the fat content. A slice will have about 20-25 grams of fat. Most of this is from the butter and chocolate.
-
Protein: The tart is low in protein, with only about 2-3 grams per slice, mainly from the egg yolk in the crust.
Tips for Healthier Versions
If you’re looking to enjoy this dessert with fewer calories or with a healthier twist, here are some simple swaps:
Ingredient Substitutions for Lower Calories
-
Use light butter or Greek yogurt instead of regular butter in the crust.
-
Choose dark chocolate with a higher cocoa percentage. This will reduce the amount of sugar in the ganache.
-
Replace regular sugar with stevia or erythritol for a lower sugar option.
Portion Control Advice
If you want to keep the indulgence without going overboard, try making mini tarts. This way, you can enjoy a small, satisfying portion. Cutting a larger tart into thin slices will also help you stick to reasonable portion sizes.
By making a few simple changes, you can still enjoy this rich dessert while cutting down on calories and sugar. It’s all about balance, and there’s no harm in treating yourself now and then!
Common Mistakes and Troubleshooting
Making Chocolate Salted Caramel Tarts can be easy, but sometimes things don’t go as planned. Here are some common mistakes and how to fix them so your tart turns out perfect every time.
Avoiding Common Pitfalls
Preventing Crust Shrinkage
A common issue when making tarts is crust shrinkage. To avoid this, make sure you chill the dough before rolling it out. After you’ve pressed the dough into the tart pan, chill it again for 15-20 minutes before baking. This will help it hold its shape.
Achieving Smooth Caramel without Crystallization
When making caramel, sometimes the sugar can crystallize, making the texture grainy. To prevent this, make sure you don’t stir the sugar while it’s melting. Stir only after the sugar has melted completely and is turning amber. If it does crystallize, don’t panic—just heat it gently until the crystals dissolve.
Ensuring Ganache Sets Properly
Another problem is when the ganache doesn’t set properly. This can happen if you use too much cream or don’t allow enough cooling time. If your ganache is too runny, refrigerate it for a longer period to allow it to firm up.
Solutions to Frequent Issues
Fixing Overcooked or Grainy Caramel
If your caramel is overcooked or grainy, don’t throw it out. You can rescue it by adding a splash of warm cream and stirring gently. This should smooth it out and bring it back to a creamy texture.
Adjusting Ganache Consistency
If your ganache is too thick, you can thin it out by adding more warm cream, one tablespoon at a time. If it’s too thin, you can thicken it by chilling it for a little longer before pouring it over the caramel.
Repairing Cracked Pastry
If your pastry cracks during baking, don’t worry. Simply use your fingers to press the cracks together. If you catch it early, you can also patch the cracks with a small piece of dough. If the cracks appear after baking, you can cover them with extra ganache or decorative toppings.
By following these tips, you can fix common mistakes and ensure your tart comes out perfectly every time. With a little practice, you’ll be making these tarts like a pro!
Frequently Asked Questions (FAQ)
Here are some common questions people have when making Chocolate Salted Caramel Tarts. Let’s clear up any doubts you might have.
Can I Make Chocolate Salted Caramel Tarts in Advance?
Yes, you can! These tarts taste even better the next day after the flavors have had time to meld together. You can make the tart a day or two ahead of time. Just be sure to store it in the fridge and let it come to room temperature before serving for the best texture.
How Do I Store Leftover Tarts?
Leftover tarts should be stored in an airtight container. Keep them in the fridge to maintain freshness. They’ll stay good for about 3-4 days. If you want to store them for a longer time, you can freeze individual slices. Just wrap them tightly in plastic wrap and foil, and they should last for up to a month.
What Are the Best Types of Chocolate to Use?
The best chocolate to use is dark chocolate with at least 60% cocoa. It gives the tart a rich, deep flavor. You can use milk chocolate if you prefer a sweeter, creamier taste. But make sure to use high-quality chocolate for the best results. It will make a noticeable difference in the final flavor of your tart.
How Can I Prevent My Caramel from Becoming Too Hard or Too Runny?
If your caramel becomes too hard, it might have been cooked for too long. Try adding a little warm cream to loosen it up. If it’s too runny, cook it a little longer to thicken. The key is to keep a close eye on the caramel while it’s cooking and remove it from the heat as soon as it reaches that perfect golden color.
These answers should help clear up any concerns you have when making your Chocolate Salted Caramel Tarts. It’s all about practice, and soon enough, you’ll be making them like a pro!
Conclusion
Chocolate Salted Caramel Tarts are a perfect blend of rich chocolate, smooth caramel, and a crispy, buttery crust. This treat is sure to impress at any gathering or simply as a special dessert for yourself.
By following the steps and tips in this guide, you can create a tart that looks as good as it tastes. Don’t be afraid to get creative with the crust, filling, or toppings. With a few simple adjustments, you can make this dessert your own.
Whether you’re a beginner or an experienced baker, Chocolate Salted Caramel Tarts are a fun and rewarding treat to make. So, go ahead, give it a try, and enjoy the delicious results!
Print
Decadent Chocolate Salted Caramel Tarts: A Perfect Fusion of Sweet and Salty Delight
- Total Time: Approx. 5 hours (including chilling)
- Yield: 8 servings (1 large tart or 8 mini tartlets) 1x
- Diet: Vegetarian
Description
Chocolate Salted Caramel Tarts are indulgent pastries that combine three luxurious layers: a buttery tart crust, smooth salted caramel, and a rich chocolate ganache topping. This dessert offers the perfect balance of sweet and salty in every bite, making it a showstopper for any occasion.
Ingredients
-
1 1/4 cups all-purpose flour (for crust)
-
1/4 cup granulated sugar (for crust)
-
1/2 cup unsalted butter (cold and cubed, for crust)
-
1 egg yolk (for crust)
-
2–3 tbsp cold water (for crust)
-
1 cup granulated sugar (for caramel)
-
6 tbsp unsalted butter (for caramel)
-
1/2 cup heavy cream (for caramel)
-
1/2 tsp sea salt (for caramel)
-
4 oz dark chocolate (at least 60% cocoa, for ganache)
-
1/2 cup heavy cream (for ganache)
-
Sea salt flakes (for garnish)
Instructions
-
Make the crust:
-
Mix flour and sugar in a bowl.
-
Add cold butter and cut into the dry ingredients until crumbly.
-
Add egg yolk and mix gently.
-
Slowly add cold water until dough comes together.
-
Wrap dough in plastic and chill for at least 30 minutes.
-
Roll out dough and press into tart pan. Chill again for 15-20 minutes.
-
Blind bake at 350°F (175°C) for 15–20 minutes or until golden. Let cool.
-
-
Make the caramel:
-
Heat sugar in a saucepan over medium heat until it melts and turns golden brown.
-
Add butter and stir until smooth.
-
Slowly pour in heavy cream while stirring (be careful, it will bubble).
-
Stir until smooth, then remove from heat and add sea salt.
-
Let cool for a few minutes, then pour into cooled tart crust.
-
Chill for at least 2 hours.
-
-
Make the ganache:
-
Heat heavy cream in a saucepan until it just begins to simmer.
-
Pour over chopped dark chocolate in a bowl.
-
Let sit for a few minutes, then stir until smooth and glossy.
-
Pour over the caramel layer, smoothing with a spatula.
-
Let cool in the fridge for at least 4 hours (or 30 minutes in the freezer for quicker results).
-
-
Garnish:
-
Once set, sprinkle the tart with a pinch of flaky sea salt and optional chocolate shavings or berries.
-
Notes
You can use milk chocolate for a sweeter, creamier finish.
Substitute almond flour or a gluten-free flour mix for a gluten-free crust.
For a vegan version, swap dairy butter and cream with plant-based alternatives.
Add a splash of vanilla or orange liqueur to the ganache for an extra flavor kick.
- Prep Time: 30 minutes (for crust and caramel preparation)
- Chilling Time: 4 hours 10 minutes
- Cook Time: 20 minutes (for blind baking crust)
- Category: Dessert, Pastry, Special Occasion
- Method: Baking, Ganache-making, Caramel-making
- Cuisine: French, American