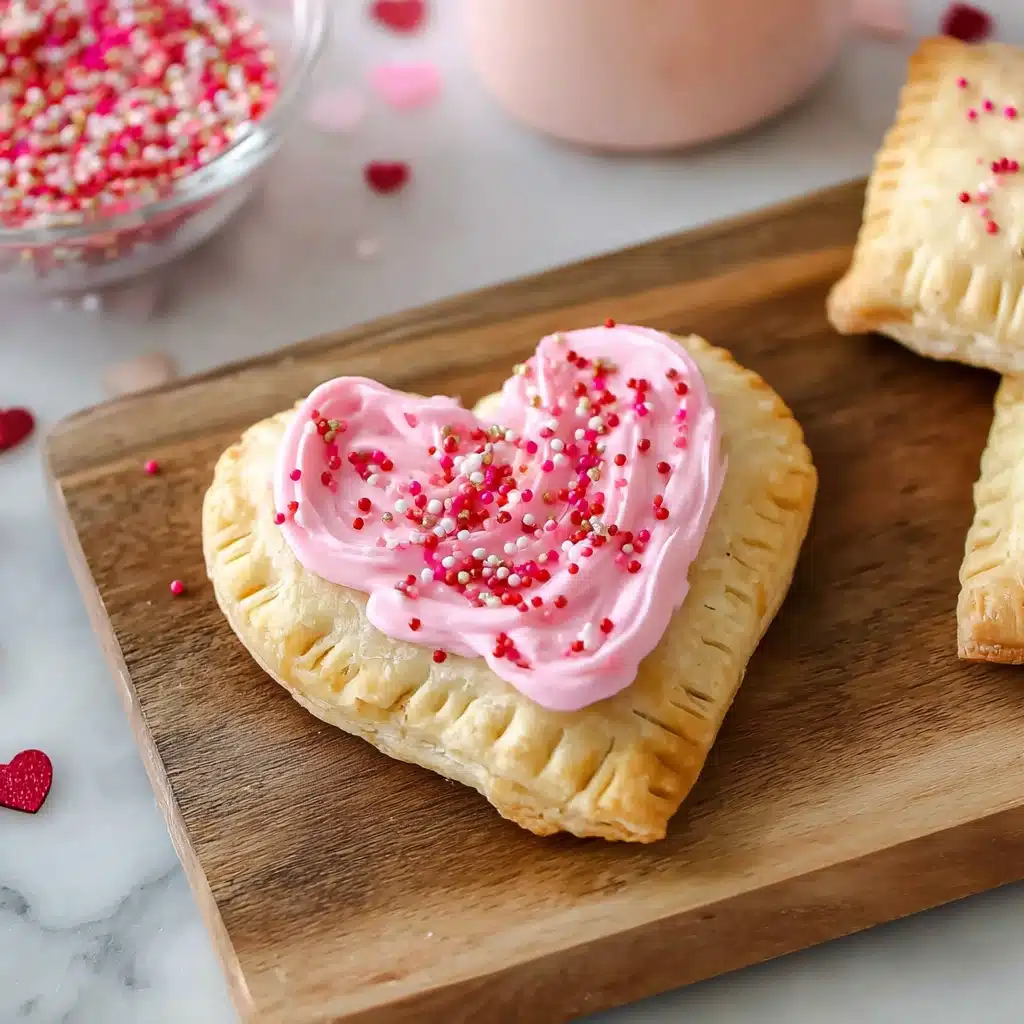
Homemade pop tarts turn a simple morning into something warm, fun, and comforting. Because this homemade version uses pie crust pastry, you get crisp edges, tender centers, and plenty of strawberry filling. The focus keyword homemade pop tarts appears early here to help readers—and search engines—instantly understand the purpose of this guide. This recipe works for Valentine’s breakfast, a quick after-school snack, or a playful weekend bake that kids enjoy. With easy steps, simple ingredients, and a smooth icing finish, these toaster pastries become a delightful treat every time.
Why Homemade Pop Tarts Offer Better Flavor and Texture
Strawberry Pop Tarts Made Fresh
Homemade pop tarts deliver a level of freshness that store-bought pastries can’t match. When using real strawberry jam, each bite feels bright, sweet, and naturally fruity. Because the filling warms as the pastry bakes, the flavor blends beautifully with the buttery pie crust pastry. Many popular recipes online highlight the benefit of choosing high-quality jam, since it produces a richer center that spreads evenly inside the pastry during baking. This creates a smooth texture that avoids artificial sweetness while giving the treat a more balanced taste. The combination of crisp edges and soft filling makes every homemade pastry feel comforting and satisfying.
Pie Crust Pastry Creates a Tender Bite
Most top-ranking guides agree that premade pie crust gives the perfect shortcut without sacrificing taste. The crust bakes quickly, holds its shape, and browns evenly, which helps the hearts stay neat and sturdy. Because the dough is rolled thin, the pastry bakes through in minutes, keeping the filling warm but not runny. Pie crust pastry also adds a slight flake that complements the sweet strawberry filling. This reliable texture makes it ideal for homemade toaster pastry creations, especially when baking with kids who enjoy quick results. The consistency remains dependable, producing uniform pop tarts with minimal effort.
Print
Homemade Pop Tarts
- Total Time: 30 minutes
- Yield: Homemade Pop Tarts
Description
How to make homemade pop tarts with pie crust and strawberry jam.
Ingredients
2 Refrigerated Premade Pie Crusts (at room temperature)
Strawberry Jam
1 Egg
Icing:
1/2 Cup of Confectioners Sugar
2 Tbsp of Milk
1/2 Tsp of Vanilla Extract
1 Drop of Red Food Coloring
Sprinkles
Instructions
1. Preheat oven to 400°F
2. On a bakers mat, parchment paper or a counter with flour unroll the premade pie crust.
3. Using a heart cookie cutter start cutting heart shaped pieces and place them onto a parchment lined cookie sheet. You will want to rotate your cookie cutter to get as many cuts as possible out of your pie crust. Knead remaining pie crust and roll it out to about 1/8 inch thick and cut the remaining hearts.
4. On half the hearts place one tablespoon of jam in the center of the heart. It does not need to be perfectly spread. It will even out when baking.
5. In a small bowl beat an egg for your egg wash. Brush the inside edges of your heart.
6. Place a heart cut out on top. Now seal the edges together with your finger. Then use a fork and press down to crimp the edges around the whole heart.
7. Use the fork to poke some holes into the top of the pop tart to release steam. Brush the pop tarts with the egg wash.
8. Bake at 400°F for 10-12 minutes
9. Cool on a wire rack.
10. While cooling make the icing. Whisk together confectioner’s sugar, milk and vanilla. Once the consistency is smooth add one drop of red food coloring.
11. Using a spoon add icing to the top of the pop tart. Use the back of the spoon or a small spatular to smooth it out. Top with red and pink sprinkles.
Notes
Want to make a different shape? Grab a different cookie cutter or make a traditional rectangle pop tart by using an index card and a pizza cutter.
- Prep Time: 15 minutes
- Cook Time: 10 minutes
- Category: Breakfast
- Method: Baking
- Cuisine: American
The Benefits of Making Valentine’s Breakfast Pop Tarts
Kid-Friendly Snack With a Sweet Theme
Heart-shaped pop tarts feel festive, cheerful, and perfect for Valentine’s Day celebrations. Children enjoy the process of cutting shapes and decorating the tops, which keeps them involved from start to finish. Many families use these pastries as a seasonal breakfast treat because they look charming yet remain simple enough for busy mornings. Making these at home adds a personal touch that store-bought pastries lack. Because the dough is soft and easy to handle, kids can help crimp edges, apply icing, and add sprinkles without difficulty. This makes the treat an activity and a snack in one.
A Homemade Toaster Pastry With Customizable Flavors
While strawberry pop tarts remain the classic choice, you can easily expand into raspberry, chocolate, blueberry, or even cinnamon sugar fillings. The structure of the pastry stays the same, so you can switch flavors based on preference or occasion. Many readers look for homemade toaster pastry options to reduce additives while still enjoying a nostalgic treat. Custom fillings help create a pastry that suits different tastes, and seasonal shapes keep the recipe fun year-round. For Valentine’s breakfast, the heart shape adds charm, and the pink icing ties the theme together.
How to Assemble Homemade Pop Tarts With Ease
Simple Assembly With Premade Dough
Working with room-temperature pie crust pastry makes shaping pop tarts smooth and predictable. Most successful guides encourage unrolling the dough gently to avoid cracks. Using a heart cookie cutter helps you produce consistent shapes, while re-rolling scraps ensures minimal waste. The thin, 1/8-inch dough allows each layer to crisp evenly. Once the hearts are cut, the process becomes very quick: filling, sealing, crimping, venting, and baking. The small teaspoon of jam spreads during baking, so the filling doesn’t need to be perfect. This simple assembly method keeps the recipe beginner-friendly while still looking polished.
Sealing and Baking for the Best Finish
Brushing egg wash on the inside edges of the pastry acts as “glue,” helping the hearts stay sealed while baking. Pressing down with your fingers first ensures a secure hold, and crimping with a fork adds the signature pop-tart style. Venting the top allows steam to escape, which prevents breakage and helps the pastry stay intact. Baking at a high temperature encourages browning and produces crisp edges. Once baked, cooling on a wire rack helps prevent sogginess. This step maintains the firm, pastry-style finish that defines a great homemade pop tart.
Decorating Pop Tarts for a Beautiful Presentation
Smooth Icing With a Hint of Color
The icing used for homemade pop tarts relies on confectioners sugar, milk, and vanilla. Because this mixture sets quickly, it creates that classic glossy finish. Many top recipes recommend adding just one drop of food coloring to achieve a soft pink that pairs well with strawberry filling. Applying icing while the pastry is warm—but not hot—helps it glide smoothly across the surface. Using the back of a spoon or a small spatula allows gentle spreading without tearing the crust. This process gives the pastries a neat and appealing appearance.
Sprinkles Add Color and Texture
Sprinkles transform a simple treat into something festive. Red and pink sprinkles strengthen the Valentine’s breakfast theme, while rainbow sprinkles work well for birthdays or playful snacks. Because sprinkles stick best when icing is fresh, you’ll want to add them immediately after spreading. The contrast between glossy icing and bright sprinkles creates a cheerful finish that looks attractive in photos and on serving plates. This simple decoration step also invites children to participate, making the recipe even more interactive.
Serving and Storing Homemade Pop Tarts
Perfect for Breakfast, Snacks, or Celebrations
Homemade pop tarts work well warm or at room temperature, making them ideal for many occasions. They serve beautifully as Valentine’s breakfast, after-school treats, or weekend surprises. Because the pastry holds up well, these toaster pastries can be stacked gently once the icing sets. Many bakers also prepare them for parties, treat boxes, or brunch spreads. Their small size keeps servings manageable, and their sweetness is balanced by the buttery crust. Since they bake quickly, they can be made just before serving or prepared earlier in the day.

Storage Tips for Freshness
Once cooled entirely, pop tarts can be stored in an airtight container for up to two days at room temperature. For longer storage, refrigerating them helps maintain freshness without affecting texture. To reheat, place them in a toaster oven or warm oven; avoid toasters if icing is present. Freezing is also possible before icing, allowing you to decorate after thawing. These storage ideas match guidance from many bakers who value convenience without sacrificing taste. By preparing extra batches ahead of time, you always have a kid-friendly snack ready when needed.
FAQ
Can I use homemade pie crust instead of premade?
Yes. Homemade crust works well if rolled thin. It produces a softer finish but still holds its shape.
Do these pop tarts work with other fillings?
Absolutely. Raspberry, blueberry, chocolate, and lemon curd all perform well in this pastry structure.
Can I make them gluten-free?
Using a gluten-free pie crust pastry keeps the shape consistent while offering the same assembly steps.
How do I keep the filling from leaking?
Seal the edges with egg wash, then crimp with a fork. Venting the top prevents pressure buildup.
Should I chill them before baking?
Chilling helps hold the shape, but it’s optional. The recipe still bakes cleanly without refrigeration.
Conclusion
Homemade pop tarts bring together buttery crust, sweet strawberry filling, and cheerful decoration in a simple yet rewarding recipe. This guide shows that you can prepare a delightful Valentine’s breakfast or a kid-friendly snack using only a few basic ingredients. With quick assembly, fun shapes, and a smooth icing finish, these pastries become a treat worth making again and again.
Discover more delicious recipes by following me on Facebook and Pinterest.