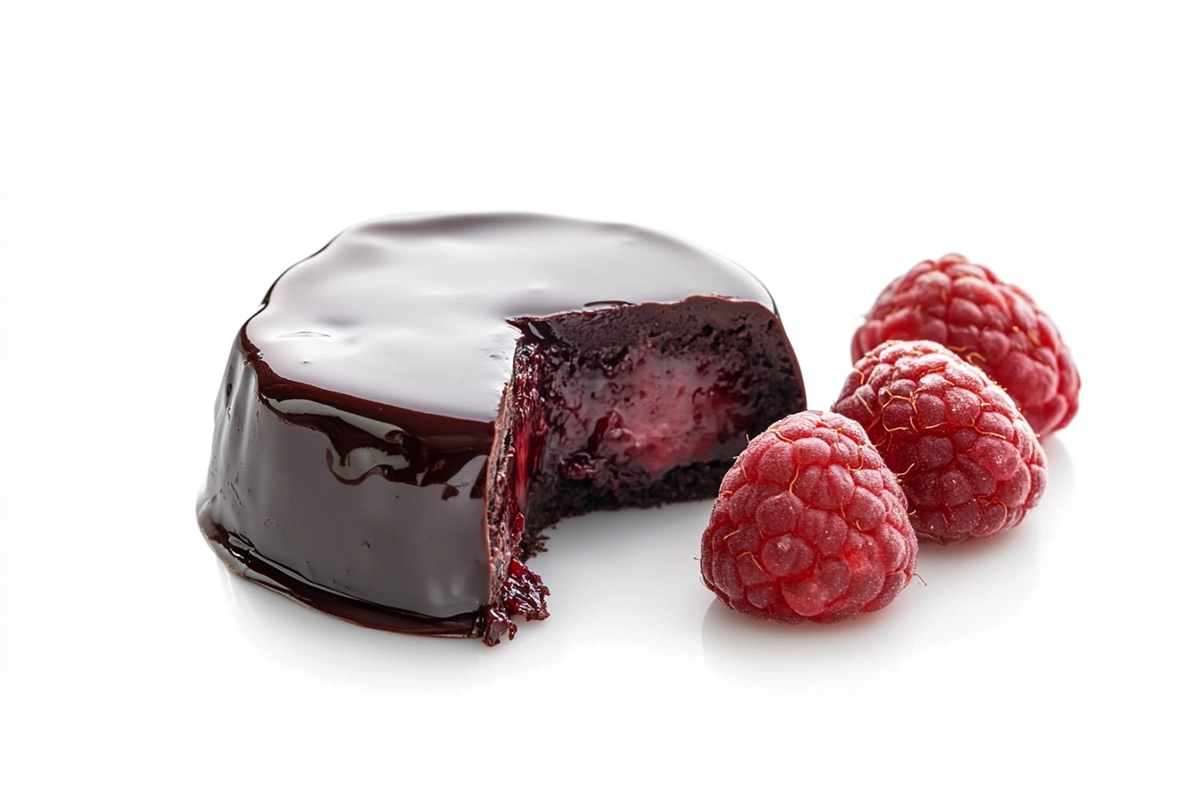
Craving a dessert that’s rich, gooey, and just the right amount of fruity? Raspberry chocolate lava cake might just be your new obsession. This indulgent treat combines the deep, velvety smoothness of dark chocolate with the tart pop of raspberries. And when you cut into the center? A warm, molten core oozes out, making every bite a luxurious experience.
This article dives deep into everything you need to know—from its origins and ingredients to how to perfect it in your kitchen. Ready to take your dessert game up a notch? Let’s get started.
Introduction
Overview of Raspberry Chocolate Lava Cake
Raspberry chocolate lava cake isn’t just a dessert—it’s an experience. At first glance, it looks like a simple mini cake. But one cut of the fork reveals its magic. The center bursts open, revealing a molten pool of rich chocolate lava mingled with vibrant raspberry filling. It’s got that perfect contrast—warm meets cool, dark meets tangy, creamy meets fruity.
The pairing of raspberries and chocolate has always been a match made in heaven. Their natural tartness balances the deep intensity of the chocolate. Together, they create a mouthwatering balance that’s both bold and elegant.
This dessert isn’t just for fancy dinners or Valentine’s Day. It’s a show-stopping treat that’s easy enough for weeknights and impressive enough for guests. And the best part? It can be made in under 30 minutes with simple ingredients.
Popularity and Appeal
Molten lava cakes have been adored since the late ’80s, and there’s no sign of that love fading. What makes the raspberry version extra special is its natural balance of flavors. While the chocolate brings richness, the raspberries add freshness and complexity.
It’s also incredibly versatile. Whether served with vanilla ice cream, fresh berries, or even whipped cream, it always steals the show.
From food blogs to restaurant menus, this cake has carved out its place as a modern classic. It’s a dessert that feels luxurious without being fussy. Perfect for romantic dinners, birthdays, or just satisfying your chocolate craving with something a bit extra.
So, now that we’ve whetted your appetite, let’s peel back the layers and see where this delightful dessert came from.
History and Origin
The Birth of Molten Lava Cakes
This dessert has a sweet backstory. The original molten chocolate lava cake was created by accident. Chef Jean-Georges Vongerichten, a famous French-American chef, pulled a chocolate cake out of the oven too early. Instead of being fully baked, it had a gooey center. But when he tasted it—magic! People fell in love with that warm, flowing chocolate middle.
That happy mistake happened in New York during the late 1980s. Since then, the lava cake has become a favorite all over the world. You’ll see it on dessert menus from fancy restaurants to cozy cafés.
Evolution with Raspberry Integration
Adding raspberries was a genius move. Over time, home bakers and chefs began experimenting with fillings. Some added peanut butter, others used caramel. But raspberry? That was a game changer.
The fruit’s sharp flavor cuts through the richness of the chocolate. It adds brightness and makes the dessert feel lighter, even though it’s still indulgent. Raspberries also bring a burst of color. That deep red center, surrounded by warm cake, is as beautiful as it is tasty.
This twist gave the lava cake new life. Now, you’ll find recipes that use fresh raspberries, raspberry puree, or jam. Each one brings a little something special to the table.
Up next, we’ll look at what goes into making this dessert. Spoiler alert: It’s simpler than it looks.
Ingredients Breakdown
Core Ingredients for the Cake
A great raspberry chocolate lava cake starts with a few simple things. Each one plays a big role. Let’s break them down.
Chocolate
Use good-quality dark chocolate. Try to pick one with at least 70% cocoa. It gives a rich, deep taste. Avoid milk chocolate—it’s too sweet and lacks depth.
Butter
Butter makes the cake soft and moist. It also helps the chocolate melt smoothly. Use unsalted butter for better control over flavor.
Sugar
Sugar balances the bitter taste of dark chocolate. It also helps the top of the cake form a nice, slightly crisp layer.
Eggs
Eggs give structure. They hold the cake together and add richness. Some recipes use whole eggs and extra yolks for a smooth texture.
Flour
Use just a little. Too much flour makes the center firm. We want that soft, melty inside. All-purpose flour works best.
Salt
A small pinch boosts all the other flavors. It might seem tiny, but it makes a big difference.
Raspberry Filling Components
Here’s where the magic happens.
Fresh Raspberries
Fresh raspberries add a natural, fruity flavor. Crush them lightly before adding them. Their juice blends with the chocolate when baked.
Raspberry Preserves
Preserves make the center even gooey. Use seedless raspberry jam if you want a smoother filling. It melts well and blends easily with the cake.
That’s it! Nothing fancy—just simple, tasty ingredients that come together beautifully. In the next section, we’ll look at what tools you’ll need and how to prepare them.
Equipment and Preparation
Necessary Kitchen Tools
You don’t need a lot of gear to make raspberry chocolate lava cake. Just a few basics. Most of them are already in your kitchen.
Ramekins
These are small baking dishes. Use 6-ounce ones if you can. Grease them well so the cakes don’t stick. Dust with cocoa powder for extra help with release.
Mixing Bowls
You’ll need two. One is for melting chocolate and butter. Another for mixing the batter- Glass or stainless steel bowls work great.
Electric Mixer
A hand mixer or stand mixer makes the job easy. You’ll use it to beat eggs and sugar until fluffy. No mixer? A whisk and strong arms will do in a pinch.
Spoons and Spatulas
Use these to mix and scrape the batter. A small spoon also helps when adding the raspberry filling.
Preparing the Ramekins
Getting the ramekins ready is key. If you skip this step, the cakes might break when you try to remove them.
Grease the Inside
Rub butter all over the inside of each ramekin. Cover the bottom and sides. Don’t leave dry spots.
Dust with Cocoa Powder
Sprinkle cocoa powder inside after greasing. Tilt and tap the ramekin to coat it fully. This helps the cake slide out cleanly. Plus, it adds extra chocolate flavor.
Once your tools are ready, you’re set to start baking. Next, we’ll walk through the step-by-step recipe. It’s easier than you think.
Step-by-Step Recipe
Melting the Chocolate and Butter
Start with this step first. Cut the dark chocolate into small pieces. Add it to a bowl with the unsalted butter.
Place the bowl over a pot of simmering water. This is called a double boiler. Stir slowly until both are melted and smooth.
Take the bowl off the heat. Let it cool for a few minutes. You don’t want it too hot when mixing with the eggs.
Creating the Raspberry Filling
Now, grab your fresh raspberries. Mash a few in a small bowl. Mix with a spoonful of raspberry jam or preserves.
You want a thick but smooth mix. This will be the molten center of your cake.
Mixing the Batter
In another bowl, beat the eggs, egg yolks, and sugar until pale and fluffy. Use a hand mixer or whisk fast by hand.
Pour in the cooled chocolate and butter. Mix until smooth.
Add a small amount of flour and a pinch of salt. Stir just until blended. Don’t overmix—it should stay light and airy.
Assembling the Cakes
Spoon some batter into each greased ramekin. Fill just halfway.
Add a spoonful of raspberry filling right in the center. Try not to let it touch the sides.
Cover with more batter until the ramekin is about ¾ full.
Baking Instructions
Preheat your oven to 425°F (220°C). Place ramekins on a baking sheet.
Bake for 11–13 minutes. The edges should be firm. The center will still be soft.
Take them out and let them sit for 1 minute. Run a knife around the edges. Flip each one onto a plate.
Serve warm. The center should ooze when you cut into it. Up next: how to serve it like a pro.
Serving Suggestions
Presentation Tips
How you serve raspberry chocolate lava cake makes a big difference. A few small touches can turn it from simple to stunning.
Dust with Powdered Sugar
Once the cake is flipped onto a plate, sprinkle some powdered sugar on top. It looks pretty and adds a touch of sweetness.
Add Fresh Raspberries
Place a few fresh raspberries on the side. They match the filling and add a pop of color.
Use a Fancy Plate
Even a plain cake looks fancy on a nice plate. White plates work best—they make the cake stand out.
Drizzle with Chocolate Sauce
Want extra drama? Drizzle a little warm chocolate sauce over the top. It makes the dish look rich and tempting.
Accompaniments
You can serve this cake alone, but a few extras can take it to the next level.
Vanilla Ice Cream
This is the top choice. The ice cream and hot cake are perfect together. The vanilla flavor also balances the strong chocolate.
Whipped Cream
Light and fluffy whipped cream adds a soft touch. It’s simple but always welcome.
Mint Leaves
One or two fresh mint leaves can brighten the plate. They add a fresh smell and make everything feel fancy.
Serving is your chance to get creative. Mix and match until it feels just right. In the next section, we’ll look at how to make the recipe your own.
Variations and Substitutions
Alternative Fillings
Want to try something new? You can switch up the center. It’s easy and fun.
Peanut Butter
Spoon a bit of creamy peanut butter into the middle instead of raspberry. It melts inside and adds a nutty taste that goes well with chocolate.
Caramel Sauce
Thick caramel sauce makes a sweet, buttery surprise in every bite. Use a chilled spoonful to keep it from mixing into the batter.
Nutella or Chocolate Hazelnut Spread
This one’s for chocolate lovers. Nutella adds more richness and a soft, nutty flavor.
Dietary Adjustments
Need to make changes for allergies or preferences? No problem.
Gluten-Free Version
Swap regular flour for a gluten-free blend or almond flour. Use the same amount. The cake stays rich and soft.
Dairy-Free Option
Use dairy-free butter and dark chocolate with no milk in it. The result is still gooey and full of flavor.
Low-Sugar Option
Cut down the sugar by a small amount, or use a sugar substitute made for baking. It still tastes sweet, just a little lighter.
Don’t be afraid to play around. This recipe works with many twists. In the next section, we’ll share simple tips to help your cakes turn out perfect every time.
Tips and Tricks for Success
Ensuring a Molten Center
Getting that perfect gooey middle can be tricky. But these tips make it easier.
Don’t Overbake
This is the most important rule. Bake for 11 to 13 minutes—no more. The edges should look firm, but the center should still jiggle a little. That’s exactly what you want.
Use Room-Temperature Eggs
Cold eggs can make the batter thick and heavy. Let them sit out for 30 minutes before you start.
Don’t Skip the Ramekin Prep
Always grease and dust the ramekins well. If you don’t, the cake might stick. Then you lose that beautiful lava flow.
Make-Ahead Options
Want to save time? You can prep parts of this dessert ahead of time.
Refrigerate the Batter
Mix the batter and fill the ramekins. Then, cover with plastic wrap and store in the fridge for up to 24 hours. Let them sit out for 10–15 minutes before baking.
Freeze for Later
You can also freeze unbaked cakes. Wrap each ramekin tightly. When ready to bake, put them straight into the oven. Add 1 or 2 more minutes to the baking time.
These tips help you avoid stress and serve your cakes hot and fresh—just the way they should be. Next, we’ll answer the most common questions people ask about raspberry lava cakes.
Frequently Asked Questions (FAQ)
What is molten cake made of?
Molten cake uses simple ingredients. The main ones are dark chocolate, butter, sugar, eggs, and a little flour. For raspberry lava cake, you also add fresh raspberries or jam for the center.
Are any parts of a raspberry lava cake raw?
No. The cake is baked at a high heat. The center stays soft, but it’s still cooked. It’s just gooey because of the short bake time and melted filling.
Can I make lava cakes ahead of time?
Yes, you can. Fill the ramekins and keep them in the fridge for a day. When ready, bake as usual. Let them warm up for a few minutes before baking.
How do I know when my lava cake is done?
Look at the edges. They should be firm and set. The center should still look soft and a little shiny. Gently touch the top—it should spring back slightly but still feel soft.
Can lava cakes be reheated?
Yes, but it’s best fresh. If you have leftovers, microwave them for about 20 seconds. The center may not be as runny, but the cake will still taste good.
These answers help clear up common doubts. Lava cake sounds fancy, but once you try it, you’ll see it’s easier than it looks. Up next, we’ll wrap it all up with a sweet final thought.
Conclusion
Raspberry chocolate lava cake is more than just dessert. It’s warm, rich, and full of flavor. The mix of melted dark chocolate and tart raspberry is a perfect match. Every bite feels special.
It may look fancy, but it’s simple to make. You don’t need many ingredients. You don’t need special skills. Just good chocolate, fresh raspberries, and a few kitchen tools.
You can serve it on any day. It’s great for birthdays, dates, or a cozy night in. Add ice cream, whipped cream, or fresh berries. Make it your own.
You can also play with the recipe. Try new fillings. Use gluten-free flour. Prep ahead if you’re short on time. It’s a flexible dessert that always impresses.
Now you know the secret to this gooey, fruity treat. So, why not bake one tonight? Your fork—and your taste buds—will thank you.
Print
Raspberry Chocolate Lava Cake: A Decadent Delight Bursting with Flavor
- Total Time: 27 minutes
- Yield: 4 servings 1x
- Diet: Vegetarian
Description
Indulge in Raspberry Chocolate Lava Cake, a luxurious dessert that’s both decadent and easy to make! Rich, gooey dark chocolate cake meets a molten raspberry center, creating the ultimate sweet and tangy experience. Perfect for special occasions or whenever your chocolate craving strikes.
Ingredients
Cake Batter:
-
4 oz high-quality dark chocolate (70% cocoa), chopped
-
½ cup unsalted butter
-
½ cup granulated sugar
-
2 large eggs
-
2 large egg yolks
-
¼ cup all-purpose flour
-
Pinch of salt
Raspberry Filling:
-
½ cup fresh raspberries, lightly mashed
-
2 tablespoons raspberry preserves or jam
For Preparing Ramekins:
-
Butter (for greasing)
-
Cocoa powder (for dusting)
Instructions
Preparation:
-
Preheat oven to 425°F (220°C). Butter and dust 4 ramekins with cocoa powder.
-
In a bowl over simmering water, melt chocolate and butter until smooth. Remove from heat, cool slightly.
-
In another bowl, beat eggs, egg yolks, and sugar until pale and fluffy.
-
Combine melted chocolate mixture with egg mixture. Stir gently.
-
Add flour and salt. Mix just until combined; don’t overmix.
Assembling the Cakes:
-
Fill ramekins halfway with batter.
-
Add a spoonful of raspberry filling in the center.
-
Cover with more batter until ramekins are ¾ full.
Baking:
-
Bake for 11–13 minutes. Edges should be firm, centers soft.
-
Cool for 1 minute. Run knife around edges and flip onto plates.
Notes
-
Serve warm, garnished with powdered sugar, fresh raspberries, ice cream, or whipped cream.
-
Prepare the batter ahead and refrigerate it for up to 24 hours, or freeze the unbaked cakes for later use.
- Prep Time: 15 minutes
- Cook Time: 12 minutes
- Category: Dessert
- Method: Baking
- Cuisine: French/American