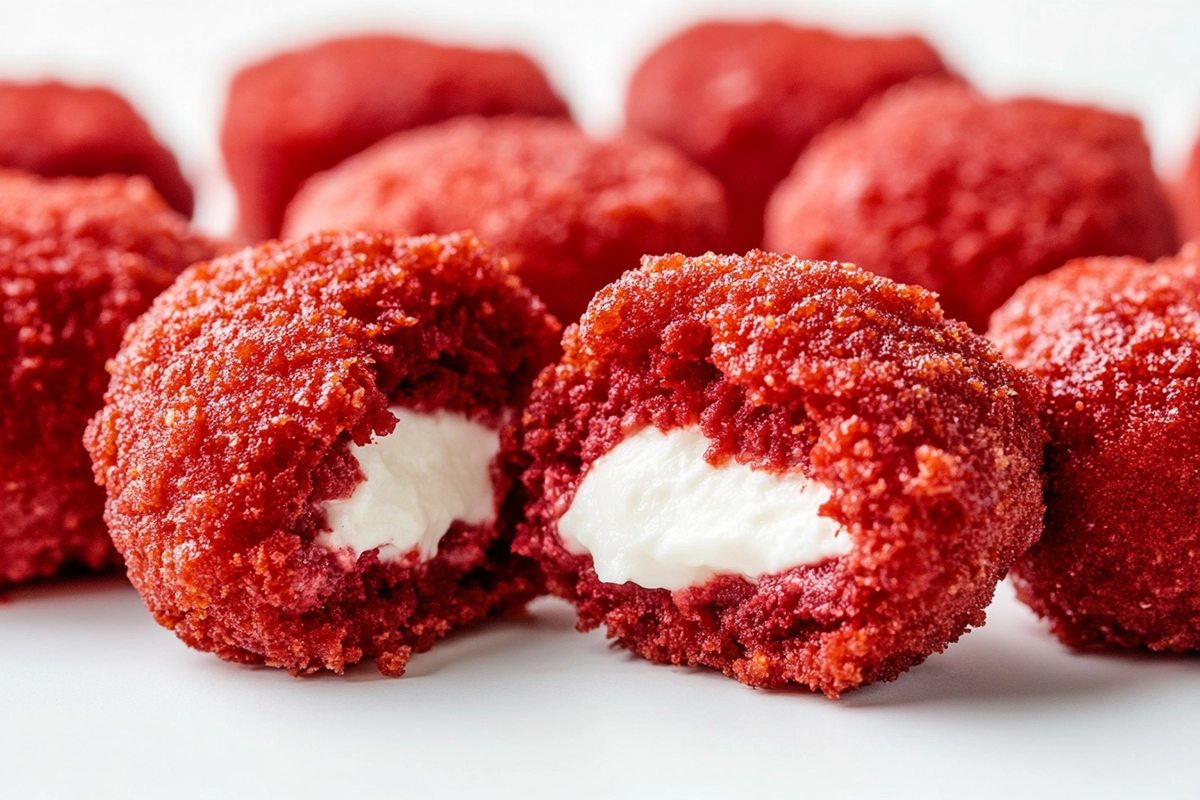
Who doesn’t love a bite-sized dessert that’s rich, creamy, and indulgent? Red velvet cheesecake balls are the perfect blend of velvety cake, smooth cream cheese, and a luscious chocolate coating. These little treats are not only easy to make but also perfect for any occasion—whether it’s a party, holiday gathering, or just a sweet craving that needs to be satisfied!
This guide will walk you through everything you need to know, from why you’ll love this recipe to step-by-step instructions and pro tips for the perfect bite. Let’s dive in!
Introduction
A Personal Reflection on the Allure of Red Velvet Desserts
There’s something about red velvet that makes it stand out. Maybe it’s the eye-catching deep red color, or perhaps it’s that signature flavor—a delicate balance between chocolate and vanilla with a slight tang from the buttermilk. Whatever the reason, red velvet desserts have captured hearts for generations.
But when you take that classic flavor and mix it with rich, creamy cheesecake, you get something truly magical: red velvet cheesecake balls! They’re like cake pops, but even better—no need for lollipop sticks, and they’re incredibly easy to make.
I remember the first time I made these; they were a hit at a family get-together. One bite and everyone was asking for the recipe. That’s when I knew I had to perfect it. Over the years, I’ve experimented with different variations, coatings, and fillings to create the ultimate version of this dessert. Now, I’m sharing everything I’ve learned so you can make them effortlessly at home.
What This Article Covers and Why You Should Try This Recipe
In this article, you’ll discover:
A simple, step-by-step guide to making red velvet cheesecake balls
The best ingredient swaps for dietary preferences
Pro tips for the creamiest, most flavorful filling
Unique variations to suit any occasion
Perfect pairings to complement these bite-sized treats
If you love cheesecake, red velvet cake, or just decadent desserts in general, this recipe is a must-try! Plus, these little delights require minimal baking, making them a fuss-free treat.
Get ready to create a dessert that’s bound to impress!
Recipe Overview
Red Velvet Cheesecake Balls: Quick Snapshot
If you love desserts that are simple yet impressive, red velvet cheesecake balls are for you. They combine the best of both worlds—rich red velvet cake and creamy cheesecake—all rolled into bite-sized treats. Covered in a smooth chocolate shell, they are irresistibly delicious.
These little desserts are perfect for any occasion. Whether it’s a party, holiday, or just a weekend treat, they are always a hit. Best of all, they are super easy to make. No advanced baking skills are needed!
Estimated Cooking Time
Total Time: About 1 hour
Prep Time: 30 minutes
Chilling Time: 30 minutes
Difficulty Level
Easy – Anyone can make these!
Serving Size
Makes: About 24 balls
You don’t need fancy equipment or hard-to-find ingredients. Just a few simple steps, and you’ll have a treat that looks as good as it tastes!
Now, let’s dive into why this recipe is a must-try!
Why This Recipe?
The Unique Appeal of Red Velvet Cheesecake Balls
Why are red velvet cheesecake balls so special? Simple. They bring together the rich, chocolatey taste of red velvet cake and the creamy smoothness of cheesecake. Each bite is soft, sweet, and melts in your mouth.
Unlike full-sized cakes, these treats are easy to serve. No slicing. No messy plates. Just grab it and enjoy! They also look fancy, making them perfect for parties, birthdays, or even as gifts.
Combining Classic Flavors for a Modern Twist
Red velvet has been a favorite for decades. Its deep red color and mild cocoa flavor make it stand out. When mixed with cream cheese, it becomes even better. The tangy, creamy filling balances the sweetness, making each bite just right.
These little treats also have a crunchy chocolate coating. That adds the perfect contrast to the soft inside. Every bite is a mix of smooth, rich, and slightly crisp textures.
Addressing Common Dessert Challenges
Some desserts take too long to make. Others require special tools. But not these! Red velvet cheesecake balls are simple. You don’t need a mixer or a fancy kitchen setup. A bowl, a spoon, and your hands are enough!
They also store well. You can make them ahead and keep them in the fridge. No last-minute stress! Plus, they’re freezer-friendly. Just take them out when needed.
Love to experiment? These treats are super customizable. You can coat them in white, milk, or dark chocolate. Add sprinkles, crushed nuts, or drizzle extra chocolate on top. The options are endless!
With all these benefits, it’s clear why these cheesecake balls are a must-try. They’re easy, fun, and always delicious!
Next, let’s look at the ingredients you’ll need!
Ingredients & Substitutions
Comprehensive Ingredient List
Making red velvet cheesecake balls is simple. You only need a few basic ingredients. Most of them are probably in your kitchen already!
Table of Ingredients with Measurements
| Ingredient | Amount |
|---|---|
| Red velvet cake (baked) | 2 cups (crumbled) |
| Cream cheese (softened) | 8 oz (1 block) |
| Powdered sugar | ½ cup |
| Vanilla extract | 1 teaspoon |
| White chocolate (melted) | 12 oz |
| Milk chocolate (melted) | 12 oz |
| Sprinkles or crushed nuts (optional) | For garnish |
These ingredients create a soft, creamy, and flavorful filling. The chocolate coating adds a little crunch for the perfect bite.
Possible Substitutions for Dietary Preferences
Need to make adjustments? No problem! Here are some swaps:
Dairy-free – Use dairy-free cream cheese and vegan chocolate
Gluten-free – Swap the red velvet cake for a gluten-free version
Less sugar – Reduce the powdered sugar or use a sugar substitute
You can also get creative! Instead of white chocolate, try dark chocolate for a richer taste. Prefer a crunch? Roll them in crushed cookies or nuts before the chocolate sets.
With just a few tweaks, you can make these red velvet cheesecake balls fit any diet or taste!
Now, let’s move on to how to make them!
Step-by-Step Instructions
How to Make Red Velvet Cheesecake Balls
Making red velvet cheesecake balls is easy. Just mix, roll, chill, and dip in chocolate. Follow these simple steps for the perfect treat!
Detailed Steps with Numbered Instructions
Step 1: Prepare the Cake
- Bake a red velvet cake or use store-bought.
- Let it cool completely.
- Crumble the cake into fine pieces using your hands or a fork.
Step 2: Mix the Filling
- In a bowl, mix the cream cheese, powdered sugar, and vanilla extract.
- Stir until smooth and creamy.
- Add the crumbled red velvet cake to the mixture.
- Mix well until everything sticks together.
Step 3: Shape the Balls
- Scoop small portions using a spoon or cookie scoop.
- Roll into smooth balls using your hands.
- Place them on a baking sheet lined with parchment paper.
Step 4: Chill the Balls
- Put the tray in the fridge for at least 30 minutes.
- This helps them firm up, making them easier to coat in chocolate.
Step 5: Melt the Chocolate
- In a microwave-safe bowl, melt the white or milk chocolate in 30-second bursts.
- Stir after each interval until smooth.
- Let it cool slightly so it doesn’t melt the cheesecake balls.
Step 6: Dip and Coat
- Using a fork or toothpick, dip each ball into the melted chocolate.
- Let the excess chocolate drip off.
- Place them back on the lined baking sheet.
Step 7: Add Toppings (Optional)
- Sprinkle with crushed nuts, sprinkles, or extra chocolate drizzle.
- Let them sit until the chocolate hardens.
Step 8: Serve and Enjoy!
- Once set, transfer them to a plate or airtight container.
- Enjoy it right away or store it in the fridge for later!
Pro Cooking Tips for Best Results
Use soft cream cheese – It blends better and makes a smoother filling.
Crumble the cake finely – Large chunks make it hard to roll.
Chill before dipping – Cold balls hold their shape in the warm chocolate.
Use good-quality chocolate – It melts better and gives a rich taste.
That’s it! With just a little effort, you get a dessert that looks fancy but is super easy to make.
Next, let’s explore creative ways to customize your cheesecake balls!
Pro Tips & Variations
Enhancing and Customizing Your Dessert
Want to make your red velvet cheesecake balls even better? Try these simple tips and fun variations!
Expert Advice on Flavor Enhancements
Use high-quality chocolate – It melts smoother and tastes richer.
Don’t skip the chilling step – Cold balls are easier to dip and coat.
Let the chocolate set fully – This keeps the coating crisp and neat.
Add a pinch of salt – It balances the sweetness and enhances flavor.
Variations to Suit Different Occasions
There are endless ways to customize these treats!
Holiday Twist – Add festive sprinkles for Christmas, Valentine’s Day, or Halloween.
Extra Chocolatey – Mix mini chocolate chips into the filling for more richness.
Nutty Crunch – Roll in crushed pecans, almonds, or hazelnuts before the chocolate sets.
Berry Surprise – Add a bit of strawberry jam inside for a fruity center.
Coconut Coating – Sprinkle shredded coconut on top for a tropical twist.
Love a bit of crunch? Try adding cookie crumbs to the coating. Prefer a smooth texture? Stick with a classic chocolate shell.
These little changes make red velvet cheesecake balls even more fun! Plus, they let you match them to any event or taste.
Now, let’s find the perfect treats to pair with them!
Pairing Suggestions
Perfect Complements to Red Velvet Cheesecake Balls
These sweet bites taste amazing on their own. But pairing them with the right treats makes them even better!
Ideal Beverage Pairings
Milk – A classic! Creamy milk balances the rich flavor.
Coffee – A hot cup of coffee pairs well with the sweet, tangy taste.
Tea – Try black or green tea for a light contrast.
Milkshakes – A vanilla or chocolate shake adds extra indulgence.
Complementary Side Desserts
Cookies – Serve with soft chocolate chip or shortbread cookies.
Fresh Berries – Strawberries or raspberries add a juicy, fresh touch.
Ice Cream – Vanilla or chocolate ice cream creates a creamy combo.
Mini Cupcakes – A fun option for dessert platters.
Want a fancier look? Arrange red velvet cheesecake balls with berries and whipped cream on a platter. It’s simple but looks elegant!
These pairings make any occasion extra special. Whether it’s a party or just a treat for yourself, they create the perfect sweet experience!
Next, let’s compare these treats to similar desserts!
Comparison Section
Red Velvet Cheesecake Balls vs. Traditional Cake Pops
Both treats are small, sweet, and delicious. But they have key differences!
Differences in Ingredients and Preparation
Cake Pops – Made with cake crumbs and frosting. Often attached to a stick.
Cheesecake Balls – Mixed with cream cheese for a creamier texture. No sticks are needed!
Cake Pops – Lighter and more like a regular cake.
Cheesecake Balls – Richer and smoother, thanks to the cream cheese.
Why Choose Red Velvet Cheesecake Balls?
Easier to make – No need for frosting or cake pop sticks.
Less sweet – The cream cheese balances the sugar.
Creamier texture – More like cheesecake, less like cake.
No baking required – You can use pre-made red velvet cake.
If you love soft, creamy desserts, red velvet cheesecake balls are the best choice! They are simpler, richer, and perfect for any occasion.
Now, let’s wrap up with final thoughts!
Next, let’s answer some common questions!
FAQs Section
Frequently Asked Questions
Got questions? Here are the most common ones about red velvet cheesecake balls!
1. Why are my cheesecake balls falling apart?
Your mixture might be too dry. Make sure the cream cheese is fully mixed in. If needed, add a little more until the dough holds together.
2. How do I melt chocolate without burning it?
Use a microwave in short 30-second bursts. Stir after each one. You can also melt it over a pot of simmering water (double boiler method).
3. Can I make these ahead of time?
Yes! Store them in the fridge for up to 5 days or freeze them for up to 3 months.
4. What’s the best way to coat them in chocolate?
Use a fork or toothpick. Dip each ball and let the excess chocolate drip off before placing it on parchment paper.
5. Can I use store-bought cake?
Absolutely! Just crumble a ready-made red velvet cake to save time.
6. How do I prevent sticky hands when rolling the balls?
Chill the dough first. You can also dust your hands with a little powdered sugar.
7. What’s the best chocolate for coating?
Use high-quality baking chocolate or melting wafers. They melt smoothly and set nicely.
8. Can I make these without chocolate?
Yes! Roll them in crushed cookies, cocoa powder, or shredded coconut instead.
These simple tricks help you make the perfect red velvet cheesecake balls every time!
Conclusion & Call-to-Action
Summarizing the Delight of Red Velvet Cheesecake Balls
These red velvet cheesecake balls are a must-try! They blend the rich taste of red velvet cake with the smooth, creamy texture of cheesecake. Each bite is coated in chocolate, making them even more irresistible.
They are easy to make, require simple ingredients, and work for any occasion. Whether for a party, holiday, or personal treat, they never disappoint. Plus, you can customize them with different coatings and toppings!
Try It and Share Your Experience!
Now it’s your turn! Make these delicious treats and let us know how they turn out.
Leave a comment – Did you try a fun variation?
Share a picture – Show off your creations!
Explore more recipes – Find other easy, tasty desserts!
Enjoy your homemade red velvet cheesecake balls!
That wraps up the guide! Let me know if you’d like any tweaks!
Print
The Ultimate Guide to Red Velvet Cheesecake Balls
- Total Time: 1 hour (including chilling time)
- Yield: 24-30 balls 1x
- Diet: Vegetarian
Description
These Red Velvet Cheesecake Balls are bite-sized treats that combine the rich, chocolatey flavor of red velvet cake with the creamy sweetness of cheesecake. Coated in a smooth layer of white chocolate, these indulgent truffles are perfect for holidays, parties, or as a delightful homemade gift.
Ingredients
- 1 box red velvet cake mix (plus ingredients required on the box: eggs, oil, water)
- 8 oz cream cheese, softened
- 12 oz white chocolate or white candy melts
- 1 tbsp vegetable oil (optional, for smoother chocolate coating)
- Sprinkles or red velvet cake crumbs (for garnish)
Instructions
- Bake the Cake: Prepare the red velvet cake according to the package instructions. Allow it to cool completely.
- Crumble the Cake: Once cooled, crumble the cake into fine crumbs using your hands or a food processor.
- Mix with Cream Cheese: In a large bowl, mix the cake crumbs with softened cream cheese until well combined and a dough-like consistency forms.
- Form Balls: Roll the mixture into 1-inch balls and place them on a parchment-lined baking sheet. Chill in the refrigerator for at least 30 minutes.
- Melt the Chocolate: In a microwave-safe bowl, melt the white chocolate in 30-second intervals, stirring between each interval until smooth. Add vegetable oil if needed for a thinner consistency.
- Coat the Balls: Using a fork or toothpick, dip each chilled ball into the melted white chocolate, ensuring even coverage. Allow excess chocolate to drip off.
- Decorate: Place coated balls back onto the parchment-lined tray and immediately garnish with red velvet cake crumbs or sprinkles before the chocolate sets.
- Chill and Serve: Refrigerate for 15-20 minutes to set the chocolate completely. Serve chilled or at room temperature.
Notes
- If the mixture is too soft to roll, refrigerate for 15 minutes before forming the balls.
- Store in an airtight container in the fridge for up to 5 days or freeze for up to 2 months.
- You can use dark or milk chocolate instead of white chocolate for variation.
- Prep Time: 20 minutes
- Cook Time: 25 minutes (baking time for cake)
- Category: Dessert, Snack
- Method: No-Bake (after initial cake baking)
- Cuisine: American