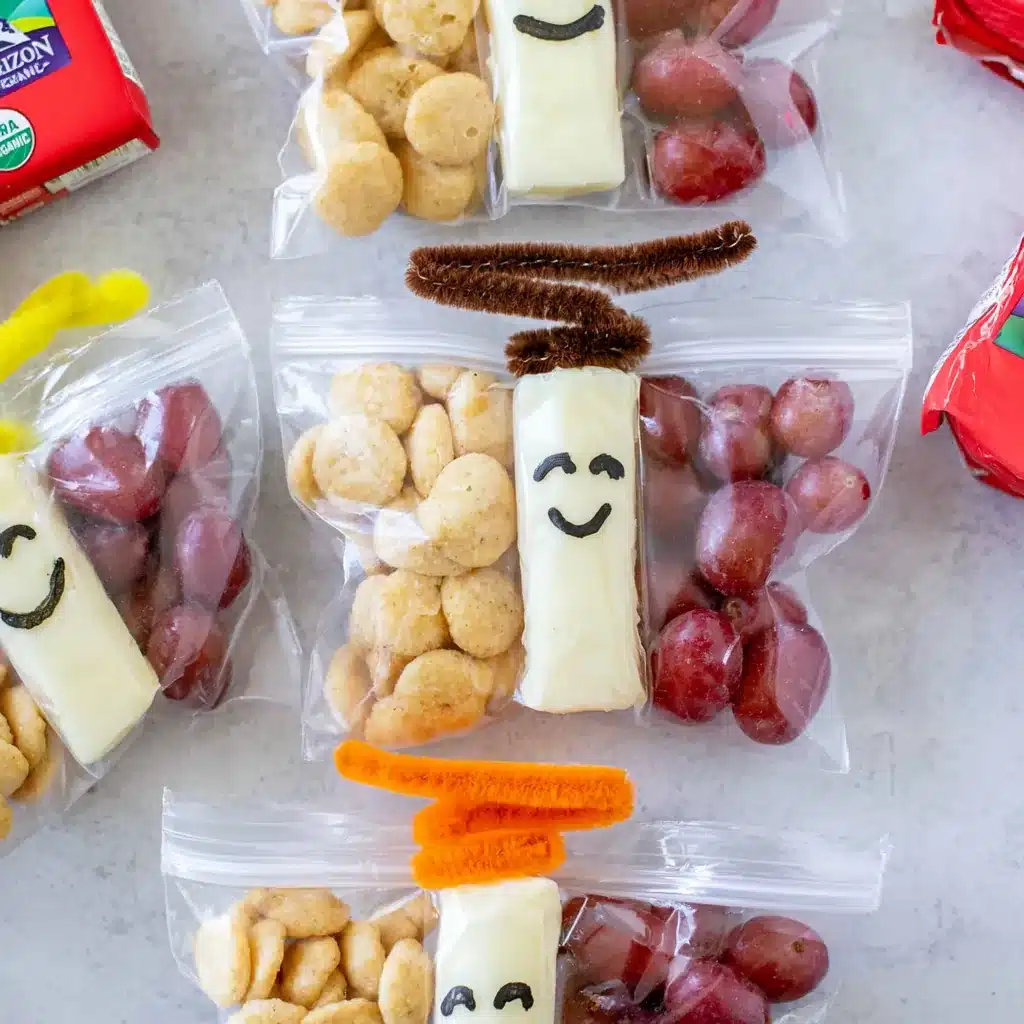
DIY Butterfly Snack Bags turn everyday fruit, crackers, and string cheese into an adorable snack that children will look forward to eating. This quick lunchbox idea takes only five minutes and requires no cooking. A pipe cleaner shapes the bag into colorful wings, while a decorated cheese stick creates the butterfly’s body. Because you can change the fillings, these bags work for school lunches, spring parties, playdates, road trips, and afternoon snacks. They also give parents a practical way to pair fruit, protein, and crunchy crackers in one portable package. Make one bag or prepare several at once for busy days.
Story
I first made DIY Butterfly Snack Bags when I needed a cheerful snack that required almost no preparation. A plain bag of grapes and crackers worked well, but it did not feel special enough for a spring-themed lunch. Once I divided the bag with a pipe cleaner and attached a smiling cheese stick, the snack looked like a butterfly with bright, edible wings. The idea immediately felt more playful without adding extra sugar or complicated decorations. These craft snack bags combine a simple food project with a balanced snack, so children can help assemble them before lunch. DIY Butterfly Snack Bags also allow plenty of flexibility. You can use grapes, berries, apple pieces, pretzels, cereal, cheese crackers, or mini sandwich crackers. Therefore, the finished snack can match your child’s tastes, allergy needs, and school rules. These fun butterfly snacks work especially well for preschool themes, garden units, birthday parties, picnics, and lunchbox surprises. Most importantly, the butterfly shape makes familiar foods feel exciting while keeping preparation fast, tidy, and manageable for parents.
Ingredients
- 1 sandwich-size zip-top bag
- 1 clean craft pipe cleaner
- 1 individually wrapped cheese stick
- 1/4 cup fresh grapes or other sturdy fruit
- 1/4 cup mini sandwich crackers
- 1 small piece of double-sided tape
- 1 food-safe marker or permanent marker for the cheese wrapper
Step-by-Step Instructions
These DIY Butterfly Snack Bags come together quickly, but thoughtful placement helps the butterfly keep its shape. First, gather every ingredient and supply before filling the bag. Next, dry the fruit thoroughly so moisture does not soften the crackers. Then divide the fillings evenly between both sides, secure the middle with the pipe cleaner, and attach the cheese stick. Keep the cheese wrapped while decorating it, and supervise young children around pipe cleaners, tape, and small foods.
Preparing the Ingredients
Wash the fresh fruit under cool running water, then dry it completely with a clean towel. Grapes work particularly well because they stay firm and fit neatly inside the bag. However, blueberries, strawberries, apple chunks, orange segments, or melon cubes also create colorful wings. Cut large fruit into safe, age-appropriate pieces. Next, measure the fruit and mini sandwich crackers into separate bowls. Keeping the wet and dry ingredients apart prevents the crackers from losing their crunch. Leave the cheese stick inside its original wrapper. Draw a small smile and two eyes on the wrapper without opening it. Finally, cut or fold a small piece of double-sided tape for attaching the cheese stick later. This preparation makes the assembly process quick and helps children participate without handling every supply at once. For a kid friendly snack craft, let children choose the wing colors and draw the butterfly’s expression while an adult handles cutting and final assembly.
Cooking Instructions
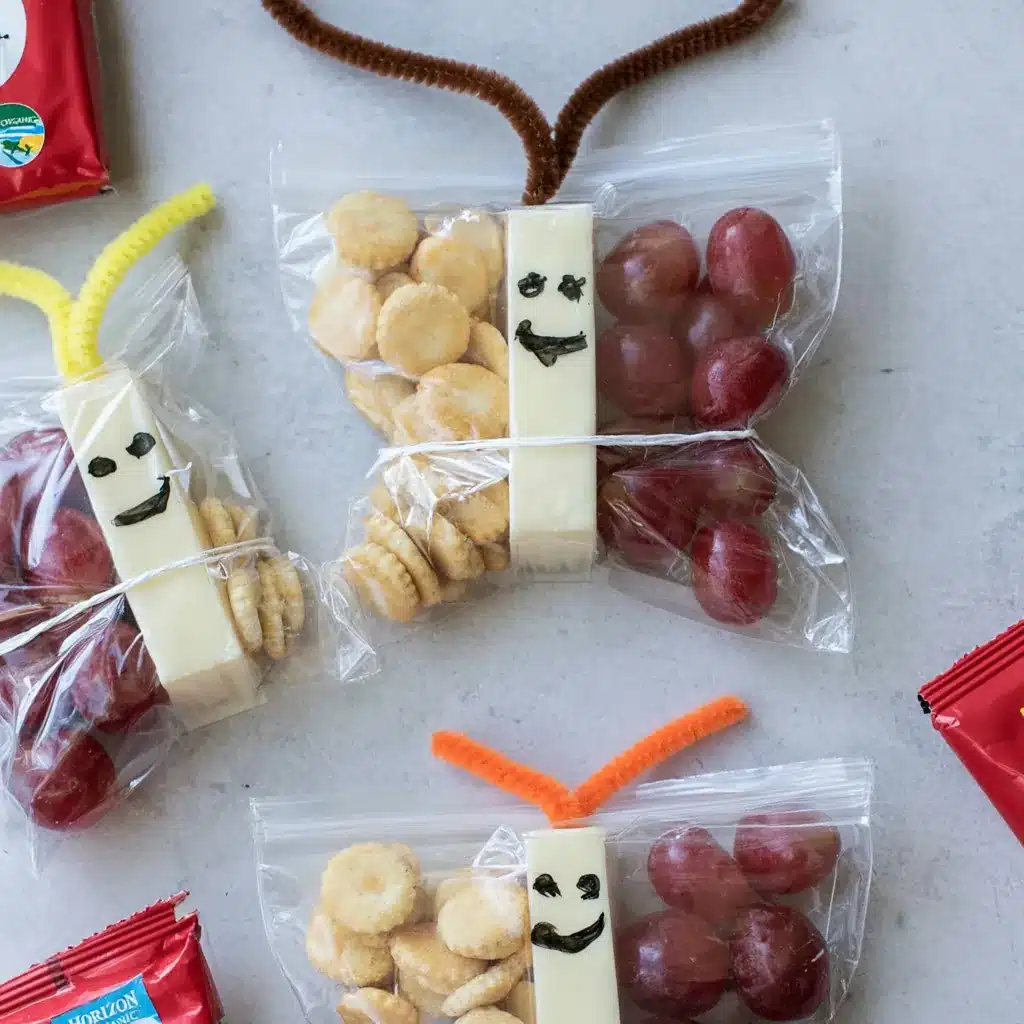
Place the open zip-top bag flat on the counter. Fill one side with the dried fruit, then fill the other side with mini sandwich crackers. Gently press out excess air and seal the bag tightly. Pinch the center so the fruit moves toward one outer edge and the crackers move toward the opposite edge. Wrap the pipe cleaner around the pinched center, twist it securely, and bend both ends upward to create antennae. Do not leave sharp wire ends exposed. Cover or curl the ends when necessary. Place the decorated cheese stick vertically over the center of the bag and secure it with double-sided tape. Adjust both sides until they resemble even butterfly wings. Serve immediately, pack the snack in a chilled lunchbox, or refrigerate it until needed. Since this recipe requires no heat, the “cooking” process simply involves safe washing, measuring, assembling, and chilling.
Tips for Perfect Results
Choose fillings that hold their shape and do not release too much liquid. Firm fruit, small crackers, pretzels, dry cereal, raisins, and cheese crackers all work well. In addition, use similar amounts on both sides so the butterfly looks balanced. Always keep moist foods separate from crunchy foods, and refrigerate the bag whenever it contains cheese or cut fruit. These small choices help DIY Butterfly Snack Bags stay attractive, fresh, and easy to carry.
Common Mistakes to Avoid
Do not place wet fruit directly beside crackers because excess water quickly creates a soft, unappealing texture. Instead, dry every piece of fruit thoroughly and keep the two foods on opposite sides of the pipe cleaner. Avoid overfilling the bag as well. A tightly packed bag becomes difficult to pinch in the center, and the wings may look uneven. Do not open the cheese stick before attaching it. The wrapper keeps the cheese clean and gives you a safe surface for drawing the face. Also, never place loose craft materials inside the bag with the food. The pipe cleaner should stay outside the sealed plastic. Finally, consider choking risks when serving grapes, nuts, hard crackers, or other small foods. Cut grapes lengthwise for younger children and choose fillings that suit each child’s age and chewing skills. Careful assembly keeps these healthy butterfly bags practical as well as cute.
Pro Tips for Better Flavor
Pair contrasting textures to make each bite more interesting. Juicy grapes taste especially good beside crisp peanut butter sandwich crackers, while strawberries pair nicely with cheese crackers. For extra protein, use whole-grain peanut butter crackers, sunflower seed butter crackers, roasted chickpeas, or a cheese stick. If the school follows a nut-free policy, check every package label and choose nut-free products from an approved facility. You can also create seasonal color combinations. Use blueberries and vanilla cereal for blue wings, strawberries and pretzels for red and brown wings, or green grapes and cheddar crackers for a bright spring look. For a party, prepare several varieties and place them on a platter. Children can choose their favorite butterfly while adults appreciate the simple portions. Although the design feels playful, the best flavor still comes from fresh ingredients, crisp crackers, and combinations your child already enjoys.
Serving and Storage
Serve DIY Butterfly Snack Bags cold when they include cheese, grapes, berries, or cut fruit. They fit neatly inside lunchboxes, picnic baskets, and small coolers. Although assembly takes only five minutes, you can prepare several bags ahead of time. The exact storage period depends on the fruit, cracker type, and refrigerator temperature, so check each bag before serving and discard any food that smells unusual or looks spoiled.
How to Serve
Place the butterfly bag flat on a plate so children can see the full shape before opening it. For lunch, pair it with a sandwich, yogurt, or vegetable sticks. For an afternoon snack, the fruit, crackers, and cheese stick can stand alone as a convenient combination of carbohydrates, protein, and fat. These bags also make appealing table favors for butterfly birthdays, spring celebrations, classroom garden lessons, or family picnics. Write each child’s name on the cheese wrapper or add a small paper label outside the bag. When serving several children, prepare allergy-safe versions separately and clearly mark them. An adult should remove the pipe cleaner and tape before a young child opens the bag. Then the child can enjoy the fruit, crackers, and cheese without loose craft pieces near the food.
How to Store Leftovers
Store assembled bags in the refrigerator for up to three to five days, depending on the fruit you choose. Whole grapes and blueberries generally hold their texture longer than sliced strawberries, melon, or apples. However, crackers may soften over time because fruit releases moisture inside the sealed bag. For the crispest result, assemble the bags on the morning you plan to serve them or place the fruit inside a small reusable liner before adding it to the larger bag. Keep the cheese stick chilled below 40°F and pack it with an ice pack when sending it to school or taking it outdoors. Do not freeze the finished bags because fresh fruit and cheese can change texture after thawing. Discard leftovers that remained at room temperature for more than two hours, or one hour during very hot weather.
Conclusion
DIY Butterfly Snack Bags offer a quick way to turn familiar lunchbox foods into a cheerful butterfly-shaped treat. With one bag, one pipe cleaner, fruit, crackers, and a cheese stick, you can prepare a colorful snack in about five minutes. Change the fillings to match your child’s favorite flavors, school policies, or seasonal theme. Then pack the finished butterfly for lunch, a picnic, a party, or an after-school surprise. Try this simple recipe the next time you need a playful snack that combines food, creativity, and convenient portions.
Discover more delicious recipes by following me on Facebook and Pinterest.
Frequently Asked Questions
Can I Make Butterfly Snack Bags Without Peanut Butter Crackers?
Yes. Replace peanut butter sandwich crackers with cheese crackers, pretzels, whole-grain cereal, mini rice cakes, popcorn for older children, roasted chickpeas, or nut-free sandwich crackers. Sunflower seed butter crackers may also work, although you should still check the label because school policies vary. Choose a dry snack that will not crumble too easily while you shape the bag. Then pair it with a sturdy fruit for balanced wings. The butterfly design does not depend on a specific cracker, so you can adjust the recipe around allergies, preferences, and available ingredients.
Can I Prepare DIY Butterfly Snack Bags the Night Before?
Yes. Wash and dry the fruit carefully, assemble the bag, and refrigerate it overnight. Whole grapes or blueberries work best because they release less juice than sliced fruit. For maximum crunch, place crackers in one side and keep the fruit completely separated by the tightly wrapped pipe cleaner. You can also prepare the decorated cheese sticks and empty butterfly bags ahead of time, then add the food in the morning. This approach takes only a minute and gives the crackers the freshest texture.
What Other Foods Work in Butterfly Snack Bags?
Many small, sturdy snacks work well. Try grapes, blueberries, apple chunks, strawberries, mandarin segments, dried fruit, pretzels, cereal, granola clusters, mini crackers, cheese cubes, cucumber slices, snap peas, or baby carrots cut for the child’s age. Use colorful combinations so each side resembles a bright wing. Avoid very juicy, sticky, or greasy foods because they can leak, stain the bag, or soften other ingredients. When packing two dry snacks, you can also mix several colors on each side for a patterned butterfly effect.
DIY Butterfly Snack Bags
- Total Time: 5 minutes
- Yield: 1 butterfly snack bag 1x
- Diet: Vegetarian
Description
Wholesome crackers, fresh fruit, and a cheese stick become an adorable butterfly-shaped snack for lunchboxes, parties, picnics, or afternoon snacking.
Ingredients
- 1 sandwich-size zip-top bag
- 1 clean craft pipe cleaner
- 1 individually wrapped cheese stick
- 1/4 cup fresh grapes or other sturdy fruit
- 1/4 cup mini sandwich crackers
- 1 small piece double-sided tape
- 1 food-safe marker or permanent marker for the cheese wrapper
Instructions
- Wash the fruit under cool running water and dry it completely.
- Measure the fruit and mini sandwich crackers into separate bowls.
- Leave the cheese stick wrapped, then draw a smiling face on the wrapper.
- Place the fruit on one side of the zip-top bag.
- Place the mini sandwich crackers on the opposite side.
- Press out excess air and seal the bag tightly.
- Pinch the center of the bag and wrap the pipe cleaner around it.
- Twist the pipe cleaner securely and curl the ends upward to form antennae.
- Attach the decorated cheese stick vertically over the center with double-sided tape.
- Adjust the fillings to form even butterfly wings, then serve or refrigerate.
Notes
- Use any sturdy fruit your child enjoys, such as grapes, blueberries, apple pieces, or strawberries.
- Replace peanut butter crackers with cheese crackers, pretzels, dry cereal, or nut-free crackers when needed.
- Dry the fruit thoroughly to help the crackers stay crisp.
- Cut grapes lengthwise and choose age-appropriate foods for younger children.
- Keep the pipe cleaner, tape, and marker ink outside the sealed food bag.
- Store the assembled bag in the refrigerator for up to 3 to 5 days, depending on the fruit.
- Pack the snack with an ice pack when it contains cheese or cut fruit.
- Prep Time: 5 minutes
- Category: Snack
- Method: No-Cook
- Cuisine: American
Nutrition
- Serving Size: 1 snack bag
- Calories: 370
- Sugar: 6
- Sodium: 715
- Fat: 11
- Saturated Fat: 5
- Unsaturated Fat: 6
- Trans Fat: 0
- Carbohydrates: 49
- Fiber: 2
- Protein: 12
- Cholesterol: 34