
If you’ve ever craved something sweet, tangy, and just the right amount of chewy, then pineapple bars are calling your name. These golden squares are a tropical twist on classic dessert bars, and they’ve been quietly stealing the show at picnics, bake sales, and Sunday brunches. But they’re more than just a pretty treat—they’re full of flavor, surprisingly easy to make, and super versatile.
Ready to dive deep into what makes pineapple bars so irresistible? Let’s start by getting familiar with what they are, why people are obsessed with them, and how they earned their spot as a dessert classic.
Introduction to Pineapple Bars
What Are Pineapple Bars?
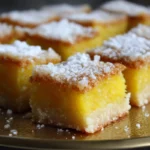
Pineapple bars are soft, moist dessert squares made with a buttery shortbread base, a sweet-tart pineapple filling, and sometimes a crumbly topping or dusting of powdered sugar. Imagine the perfect combo of cookie, cake, and pie—all in one handheld bite. They’re easy to make and even easier to love.
These bars usually use crushed pineapple as the main ingredient, giving them a bright flavor and juicy texture that sets them apart from your average lemon or berry bar. Thanks to the natural sweetness and zing of the pineapple, the taste hits just right—refreshing yet rich, tropical yet cozy.
Popularity and Appeal of Pineapple Bars
Why have pineapple bars become such a go-to dessert for home bakers and food lovers alike? For one, they’re incredibly adaptable. Whether you like your treats chewy or crumbly, sweet or slightly tart, there’s a pineapple bar version for you.
They’re also a breeze to whip up with pantry staples. No fancy gadgets or tricky techniques—just a mixing bowl, a pan, and your oven. Plus, they store well and travel even better, making them ideal for potlucks or gifting.
Another reason people rave about them? That bold pineapple flavor. It’s unexpected in a bar, which is exactly why it stands out. When you bring a plate of pineapple bars to the table, they don’t just get eaten—they get remembered.
Whether you’re new to baking or a seasoned pro, pineapple bars are a foolproof way to bring a little sunshine into your kitchen. Let’s keep the flavor train going and see how this dessert came to be.
Historical Background
Origins of Pineapple in Baking
Pineapples have been used in sweet dishes for a long time. It became popular in the early 1900s. Around the 1920s, people in the U.S. started baking with it more. One of the first big hits was the pineapple upside-down cake.
This fruity cake was featured in cookbooks and magazines. It was sweet, easy to bake, and looked beautiful when flipped. That’s when bakers realized that pineapple worked great in desserts. It added both flavor and moisture.
Soon after, other pineapple desserts started popping up. Bars, pies, and even cookies started using it. Pineapple became a star in many kitchens.
Evolution of Pineapple Bars
No one knows the exact moment when pineapple bars were born. But they likely started as a spin on lemon or berry bars. Someone thought, “What if we used pineapple instead?” And it worked.
People loved how the pineapple filling added a juicy, tropical twist. The idea spread. Some recipes added coconut. Others used cream cheese. Bakers got creative, and pineapple bars took off.
These bars are now a favorite in many places. They show up at bake sales, church picnics, and family parties. Each version is a little different. But they all have one thing in common: a sweet pineapple center that keeps people coming back for more.
Up next, we’ll break down the ingredients that make these bars so good. From the crust to the filling, each part plays a big role.
Ingredients and Variations
Core Ingredients
Pineapple bars are made with just a few simple things. Most of them are easy to find. Here’s what you’ll need:
Crust
The crust is the base. It holds everything together. It’s usually made with:
-
Butter
-
Sugar
-
All-purpose flour
This mix creates a soft, crumbly layer. It’s like shortbread. Rich and buttery.
Filling
This is where the pineapple shines. The filling is made with:
-
Crushed pineapple
-
Sugar
-
Cornstarch (or flour, sometimes)
The cornstarch helps it thicken. It should be soft but not runny.
Topping
Not all pineapple bars have a topping. But when they do, it adds texture. Common toppings include:
-
Shredded coconut
-
Crumb topping (flour, sugar, butter)
-
Powdered sugar glaze
Each one adds a little extra sweetness or crunch.
Common Variations
Want to change things up? You can. Many people try fun twists on the basic recipe.
Pineapple Coconut Bars
These are popular. Coconut pairs well with pineapple. It gives the bars a tropical taste. You can mix the coconut into the crust or sprinkle it on top.
Pineapple Cheesecake Bars
This one adds a creamy layer. A mix of cream cheese and sugar goes under the pineapple. It tastes rich and smooth. Perfect for those who love cheesecake.
Vegan Pineapple Bars
Don’t eat dairy or eggs? No problem. Use plant-based butter and egg replacers. You’ll still get that sweet pineapple flavor.
You’ve seen what goes in. Now it’s time to look at how healthy—or not—pineapple bars are.
Nutritional Information
Caloric Content
Pineapple bars are sweet. They also have sugar and butter. That means they come with calories.
A small square usually has about 150 to 250 calories. This depends on what you put into them. If you use extra toppings, like coconut or glaze, the number goes up.
Want to make them lighter? Try cutting back on sugar. You can also use low-fat butter or skip the topping.
Health Considerations
Pineapple bars do offer some nutrients. Pineapple has vitamin C. But let’s be honest—they’re still desserts.
They often have a good amount of sugar and fat. So, enjoy them in small doses. Too much can lead to sugar spikes or weight gain.
If you have health goals, try these tips:
-
Use whole wheat flour
-
Pick a low-sugar recipe
-
Add ground flaxseed or oats for fiber
-
Cut the bars into smaller servings
This way, you can enjoy the taste without going overboard.
Ready to bake your own? Let’s walk through the steps in the next section. It’s easier than you think!
Step-by-Step Recipe Guide
Ingredients List
Let’s start with what you need. These are the basic ingredients. You might already have them at home.
For the Crust
-
1/2 cup butter (softened)
-
1/4 cup brown sugar
-
1 cup all-purpose flour
This makes a soft, rich base.
For the Filling
-
1 can (8 oz) crushed pineapple, with juice
-
1/2 cup granulated sugar
-
2 tablespoons cornstarch
The mix should be thick and jam-like.
Optional Toppings
-
1/4 cup shredded coconut (for texture)
-
Powdered sugar glaze (for sweetness)
These extras make the bars look and taste better.
Preparation Steps
Follow these easy steps. No fancy tools are needed.
Step 1: Make the Crust
Preheat your oven to 350°F (175°C).
In a bowl, mix butter, brown sugar, and flour.
It should look like crumbs.
Press it into a greased 8×8-inch baking dish.
Bake for 12–15 minutes or until golden.
Step 2: Cook the Filling
In a small pot, mix crushed pineapple, sugar, and cornstarch.
Cook over medium heat.
Stir often until thick—about 5 minutes.
Take it off the heat and let it cool a little.
Step 3: Add the Filling and Topping
Pour the pineapple filling over the baked crust.
Spread it out evenly.
Add toppings like coconut or a crumb mix if you want.
Bake again for 15–18 minutes until set.
Step 4: Cool and Slice
Let the bars cool in the pan.
Put them in the fridge for 1 hour.
Then cut into squares and serve.
That’s it! Simple, fast, and full of flavor.
Next, we’ll share tips to make your bars even better.
Tips and Tricks for Perfect Pineapple Bars
Ensuring the Right Consistency
The filling should be thick, not runny.
If it’s too wet, the crust will get soggy.
Use cornstarch or flour to thicken the filling.
Let it bubble while stirring for a few minutes.
Stop cooking once it looks like jam.
This makes cutting the bars easier, too.
Want a firmer bar? Chill it longer in the fridge.
Cool bars hold their shape better.
You can also bake the crust a little longer.
A crisp crust makes a stronger base.
Storage Recommendations
These bars keep well.
Put them in a sealed container.
Store them in the fridge for up to 5 days.
They also freeze great.
Just wrap them tightly in plastic or foil.
Place in a freezer-safe bag or box.
They’ll last up to 2 months frozen.
To eat later, let them thaw in the fridge.
Or leave them on the counter for 30 minutes.
This makes pineapple bars perfect for planning.
You can bake today and enjoy all week.
Next, let’s look at how to serve and enjoy them in fun ways.
Serving Suggestions
Pairing with Beverages
Pineapple bars are sweet and fruity.
They go well with many drinks.
Try serving them with:
-
Iced tea
-
Fresh lemonade
-
Hot or iced coffee
-
A cold glass of milk
The light taste of pineapple pairs well with simple drinks.
This keeps the focus on the dessert.
Skip heavy or spicy drinks—they can take away from the flavor.
Presentation Ideas
You eat with your eyes first.
Make your bars look good on the plate.
Here are some easy ways to dress them up:
Plating
Use a clean white plate.
Place the bars neatly in rows.
Dust with powdered sugar for a soft, pretty look.
Add a small fork or dessert spoon.
Garnishing
Top each bar with a tiny mint leaf.
Or add a small piece of pineapple on top.
A few toasted coconut flakes can also add color and crunch.
You can serve them warm or cold.
Cold bars are firm and neat.
Warm bars are soft and gooey.
Both are tasty—just pick what you like.
They’re also easy to pack in lunch boxes or trays.
Use small squares for parties or big ones for dessert at home.
Coming up next: your most-asked questions—answered.
Frequently Asked Questions (FAQs)
Can I Use Fresh Pineapple Instead of Canned?
Yes, you can.
Just chop it into small pieces.
Make sure it’s juicy but not too wet.
You may need to cook it longer.
This helps it get thick and soft.
How Do I Prevent the Crust from Becoming Soggy?
Cook the filling until it’s thick.
Let it cool a little before spreading.
Bake the crust until golden.
Don’t rush this step.
It makes the base stronger.
You can also chill the bars longer.
This helps them set well.
Are There Gluten-Free Versions of Pineapple Bars?
Yes!
Use a gluten-free flour blend.
You can also try almond or oat flour.
Just check if the mix holds together.
Some versions may need an extra binder like an egg.
Always read labels to be sure the flour is gluten-free.
Can I Make Pineapple Bars Ahead of Time?
Yes, and they keep well.
Bake and cool them fully.
Store in the fridge for 3–5 days.
Or freeze for up to 2 months.
They taste just as good later.
Great for busy weeks or events.
Do Pineapple Bars Need to Be Refrigerated?
If you’re keeping them for more than a day, yes.
The filling has fruit and can spoil.
Place them in a sealed container.
Store in the fridge for freshness.
Now that all your questions are covered, let’s wrap it up with a sweet finish.
Conclusion
Pineapple bars are sweet, soft, and full of flavor.
They bring a little tropical taste to every bite.
They’re easy to make.
You don’t need fancy tools or hard steps.
Just a few basic ingredients and a baking pan are needed.
You can enjoy them plain or with toppings.
You can also change the recipe to fit your needs.
Want something vegan or gluten-free? You can do that.
They’re great for parties, lunch boxes, or a treat at home.
You can store them in the fridge or freezer.
This makes them a perfect make-ahead dessert.
Try them once, and you’ll want to make them again.
These bars are simple, tasty, and loved by many.
So go ahead—bake a batch, share a smile, and enjoy a bite of sunshine.
The Ultimate Guide to Pineapple Bars: A Tropical Dessert Favorite
- Total Time: 0 hours
- Yield: 9-12 servings 1x
Description
Pineapple bars are a tropical dessert made with a buttery shortbread crust, a sweet-tart pineapple filling, and sometimes a crumbly topping or powdered sugar glaze. These bars are easy to make and full of vibrant pineapple flavor. They’re a refreshing twist on classic dessert bars, perfect for any occasion.
Ingredients
-
For the crust:
-
1/2 cup butter (softened)
-
1/4 cup brown sugar
-
1 cup all-purpose flour
-
-
For the filling:
-
1 can (8 oz) crushed pineapple, with juice
-
1/2 cup granulated sugar
-
2 tablespoons cornstarch
-
-
Optional toppings:
-
1/4 cup shredded coconut (for texture)
-
Powdered sugar glaze (for sweetness)
-
Instructions
-
Preheat oven to 350°F (175°C).
-
For the crust: Mix butter, brown sugar, and flour. It should resemble crumbs. Press into a greased 8×8-inch baking dish. Bake for 12–15 minutes, until golden.
-
For the filling: In a small pot, combine crushed pineapple, sugar, and cornstarch. Cook over medium heat, stirring until thick—about 5 minutes. Let cool slightly.
-
Pour the filling over the baked crust, spreading evenly.
-
Add optional toppings like coconut or a crumb topping if desired.
-
Bake for an additional 15–18 minutes until set.
-
Cool in the pan, refrigerate for 1 hour, then cut into squares.
Notes
-
You can make these bars ahead of time and store them in the fridge for 3–5 days or freeze them for up to 2 months.
-
Feel free to add other toppings, like toasted coconut or a mint garnis, to enhance the flavor.
-
For a gluten-free version, substitute with gluten-free flour.
- Prep Time: 10M
- Cook Time: 30M
- Category: Dessert
- Method: Baking
- Cuisine: Tropical